AutoEntry Integration to Sage 50 Canada

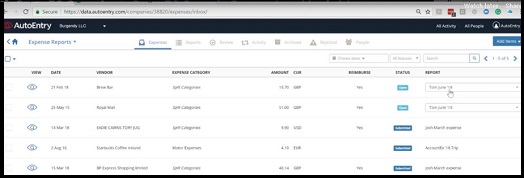
AutoEntry is an automation tool from Sage to facilitate data entry. It helps minimize data entry, allows you to reduce repetitive tasks and thus, increase efficiency. It has also developed the AutoEntry mobile app for both Android and iOS devices. With this essential app, you can capture receipts, invoices and expenses from your mobile devices seamlessly and publish data to Sage automatically.
User Navigation
Here is good news for the users of Sage 50 Canada. AutoEntry is now integrated fully with Sage 50 Canada. If you are a Sage 50 CA user, you can now capture a bill from your mobile, capture line items and match them to expense accounts on your Sage CA. With this smart cloud-based app, you can now save time and increase the efficiency of your business.
But before that, you will need to integrate AuthEntry with your Sage 50 CA. As AutoEntry is a cloud-based software and Sage 50 CA is installed locally, AutoEntry needs to be integrated with Sage for the two platforms to communicate seamlessly. If you are yet to do this, we can be of great help. Go through this blog till the end. Here, we will provide a simple, step-by-step procedure to integrate AutoEntry with Sage 50 Canada.
Read More-: What’s New in Sage 50 CA Version 2022.3
What is the Procedure to Setup AutoEntry Integration to Sage 50 Canada
To connect AutoEntry with the Sage 50 Canada company saved on your system, an application named the AutoEntry Desktop Sync App has been designed. This app will facilitate the syncing of data between your Sage 50 software and the AutoEntry application. Here, we will look at the steps of integration with the help of this app-
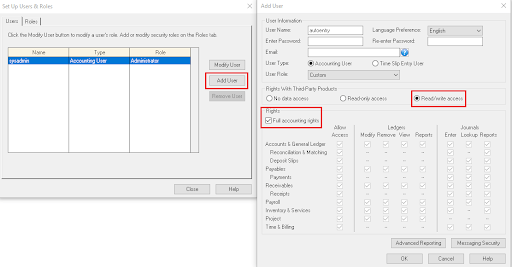
Step 1: Need to Use Multi User Mode
For smooth integration, you will need to use Sage 50 on multi-user mode. We would recommend you createa separate user within Sage 50 Canada. This user will be assigned a unique password for use only in the AutoEntry Sync App. You may give this new user a suitable name to differentiate and mark that this user is only for the AutoEntry Sync App. Also, make sure that this user is given full accounting rights along with read/write access.
Please follow the procedure below-
- Open Sage 50 Canada
- Navigate to the Setup drop-down box
- Click on Set Up Users
- If the add user option is disabled, you will need to assign a password to the sysadmin user. After this, this option will get enabled
Step 2: Setup, Change and Close
After you have set up the user, save the changes and close the Sage 50 CA Company.
Step 3: AutoEntry Sync App Download
Download the installer file of the AutoEntry Sync App from
https://download.autoentry.com/AutoEntry.DesktopSync.Installer.exe
Step 4: AutoEntry login
- Once you have downloaded the app, click to run it.
- Now open the Sync App
- You will need to log in with your AutoEntry login credential, used for accessing the AutoEntry website.
- After logging in successfully, a screen would appear, displaying all the companies you have access to in AutoEntry
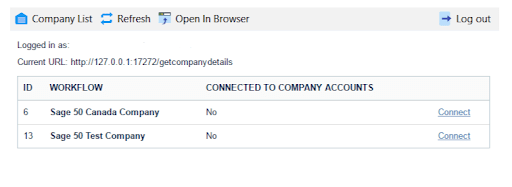
- Select the Company you want to integrate with Sage 50 Canada
- Click Connect.
Step 5: Provide User Name and Password
- You will be prompted to enter a username, password and folder path to connect to the Sage 50 Canada company you selected.
- Please make sure to select Sage Canada from the drop-down named Accounting Software ( as shown below)
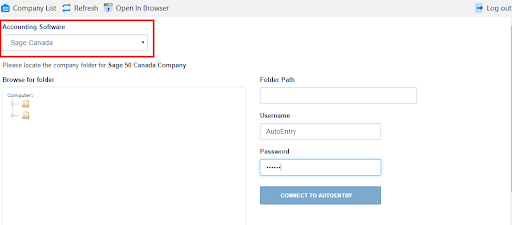
- Provide the username and password for the user you created in Step 1 above
- Your company will be integrated successfully with Sage 50 Canada.
Please Note: To get your folder path, you may follow the steps below-
- Open Sage
- Click on File
- Navigate to Properties
- The location path will be displayed by a pop-up
Also Read-: Adjusting Font Size for Sage 50 CA
Final Words
In the discussion above, we have shown you how to set up the AutoEntry Integration to Sage 50 Canada. Hope this will be of great help to you. Simply follow the steps sequentially, integrate to Sage 50 CA and avail of the enhanced benefits provided by AutoEntry seamlessly.
Accounting Professionals & Specialized Experts
Want quick help from accounting software experts? Get in touch with our team members who can install, configure and configure your software for you. Proficient in fixing technical issues, they can help you quickly get back to work whenever you encounter an error in Sage software. Our team is available 24/7 365 days to assist you. To get in touch.
Frequently Asked Questions(FAQs)
What are the advantages of the AutoEntry automation tool?
The AutoEntry automation tool provides manifold advantages. Here, we will list some of those-
🔹 You can scan invoices one by one or in batches and also as email attachments
🔹 Capture receipts, invoices and expenses from your mobile devices seamlessly and publish data to Sage automatically
🔹 With its secondary layer of data validation, you can minimize errors
🔹 With its auto-publish functionality, you can increase efficiencies.
🔹 Data is extracted accurately and securely
🔹 You do not need to store data and files anymore. They are stored securely in the cloud
How can I find the folder path that I need to enter into the AutoEntry Sync App for integrating with Sage 50 Canada?
To get your folder path, you may follow the steps below-
🔹 Open Sage
🔹 Click on File
🔹 Navigate to Properties
🔹 The location path will be displayed by a pop-up