How to Fix Sage 50 the Installation of the Pervasive Database has Failed Error
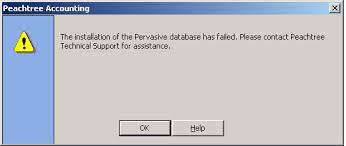
The Installation of the Pervasive Database has Failed error in Sage 50, typically occurs when the Pervasive Database Engine fails to install or update during the installation process. In this blog we are explaining its causes and steps to fix this error.
User Navigation
Are you facing issues related to your Pervasive database installation? It shows you different error messages that are for the same when the installation of the pervasive database has failed.
The Error that you get because of this are as follows:-
- Sage 50 Error 22665
- Sage 50 Error: “Error installing pervasive”
- Sage 50 Error: “Database service Manager has stopped working”
- Unable to install Pervasive
- Sage 50 Error: “Aborting install: Error installing Pervasive”.
These all errors are for the same problem that is Sage 50 the installation of the pervasive database has failed error.
To fix this, the solution is mentioned below that you have to follow properly.
Reasons Behind the Installation of the Pervasive Database has Failed Error
The error occurs due to various reasons. These include:
- A security software that might be preventing the installation or configuration of Pervasive database.
- User Account Control enabled.
- A previous faulty installation of Pervasive.
- Corrupt or damaged installation files.
- A security setting on the installation folder.
- Other programs that might be preventing the installation of Pervasive.
- Other workstations running the program.
- Insufficient Admin rights
This is a technical problem and the solution requires some level of expertise. If you are a novice computer user and do not have advanced knowledge of computer’s operating system, you might need help.
Related Article : Resolve Sage 50 Pervasive Invalid Data Error
Steps to Fix Sage 50 the Installation of the Pervasive Database has Failed Error
Follow our below mentioned solution steps to fix the Sage 50 the Installation of the Pervasive Database has Failed error message manually.
Total Time: 35 minutes
Step I: Security Software, Security settings, or other Programs preventing Installation
1. Disable the antivirus software on the computer before starting the installation.
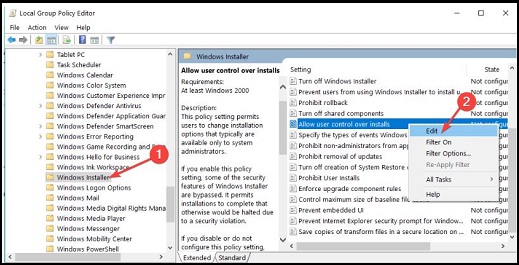
2. Disable User Account Control. For this,
3. Go to the Control Panel.
4. In the search box, type “UAC”.
5. You will see a link for ‘Turn User Account Control (UAC) on or off’.
6. On the next screen, uncheck the box for ‘Use User Account Control (UAC)’, and click OK.
7. Now boot into Selective Startup. For this,
8. Press Windows Key + R.
9. Type ‘msconfig’.
10. Select OK.
11. Now select the Services tab.
12. Check ‘Hide all Microsoft Services’.
13. Select ‘Disable All’.
14. Select the ‘Startup’ tab.
15. Select ‘Disable All’.
16. Select OK.
17. Restart the computer.
18. Next right click on ‘setup.exe’ and select ‘Run as Administrator’.
19. Verify the security settings on the install folder so that everyone has full control.
Step II: Verify if correct Installer is being used
1. Ensure your setup.exe located in the install directory for the Sage 50 version you are trying to install. Like, if the version is Sage 50 2017, the directory should be Sage50_2017[Version].
2. If you are using a setup file that is located somewhere else, then exit the install wizard and browse to the correct directory and double click on ‘setup.exe’.
Step III: Uninstall and Reinstall Pervasive
1. Close Sage 50.
2. Press Windows Key + R.
3. In the search box, type “Control Panel” and click OK.
4. Select Programs & Features.
5. Uninstall any listed version of Pervasive.
6. Now close the Control Panel.
7. Again press Windows Key + R.
8. In the search box, type “C:\” and click OK.
9. Delete the folder ‘pvsw’ and ‘pvswarch’, if present.
10. Delete any file named ‘PSQL_v##_Install.log’, ‘##’ being a version number.
11. Now browse to ‘C:\Windows’.
12. Delete ‘pvsw.log’.
13. Browse to ‘C:\ProgramData’.
14. Rename the Pervasive Software folder to OldPervasive Software.
15. Browse to ‘C:\Program Files’ or ‘C:\Program Files (x86)’.
16. Rename the Pervasive Software folder to OldPervasive Software.
17. Now browse to ‘C:\Program Files\Common Files’ or ‘C:\Program Files (x86)\Common Files’.
18. If present, rename the Pervasive Software Shared to OldPervasive Software Shared.
19. Close the computer.
20. Press Windows KEY + R.
21. Type “regedit’ and press OK.
22. Right click on the computer and select Export and save the backup of Registry.
23. On the left pane, browse to ‘HKEY_LOCAL_MACHINE\Software’.
24. Delete Pervasive Software and PEYX489ZK
25. On 64-bit PCs, browse to HKEY_LOCAL_MACHINE\Software\Wow6432Node
26. Delete Pervasive Software and PEYX489ZK
27. Close the Registry Editor.
Now You have successfully removed the Pervasive.
Step IV: Manually Reinstall Pervasive
Sure, I can provide you with some general steps for manually reinstalling Pervasive. Please keep in mind that the exact steps may vary depending on your specific operating system and version of Pervasive. Here are the general steps:
1. Uninstall the existing Pervasive installation: You can do this by going to the Control Panel, selecting “Programs and Features,” finding Pervasive in the list of installed programs, and selecting “Uninstall.” Follow the prompts to complete the uninstallation process.
2. Remove any remaining Pervasive files: After uninstalling Pervasive, you’ll want to delete any remaining files or folders related to the program. This may include files in the “Program Files” or “Program Files (x86)” folders, as well as any related registry keys. Be very careful when modifying the registry, as any mistakes can cause serious issues with your system.
3. Download the Pervasive installer: Once you’ve completely removed the previous installation of Pervasive, you’ll need to download the installer for the version you want to reinstall. You can usually find this on the Pervasive website or through a third-party software download site.
4. Run the installer: Double-click on the downloaded installer file to begin the installation process. Follow the prompts to choose your installation options and complete the installation. Make sure to read and follow any on-screen instructions carefully.
5. Test the installation: Once the installation is complete, you should test Pervasive to ensure that it’s working properly. This may involve running some test queries or verifying that any related applications are functioning as expected.
Step V: Browse to the Installation folder, it would be located at C:\Sage\Sage50_[version]
1. Open PervasiveMin folder.
2. Run the ‘PervasivePSQLv11WGE_x86.msi’ and press Next.
3. Accept the license agreement and press Next.
4. Select ‘Run as a Service’ and then press Next.
5. Select ‘Complete’, and press Next.
6. Select Install to reinstall Pervasive.
7. Click Finish to complete the process.
8. Now verify if you can install Sage 50.
Step VI: Check user Rights
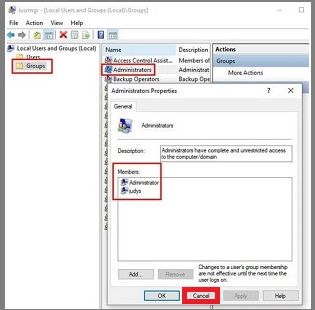
1. Verify if the current user is a Windows local administrator.
2. If not, give user local admin rights or log in as a local admin.
3. If you are using a domain network, verify if the current user is both a local admin and a domain admin.
4. If not, either give user local and domain admin rights or log in as an administrator that has both the rights.
Step VII: From the Server, Run the standard Installation
1. Search for the \\<servername you are using>\PeachtreeInstaller20XX (XX is the version)
2. Now in the server, search for the folder name Peachw
3. Then open the Install folder
4. Run the installation file that is named _Setup.exe
5. Make sure that you run the setup as the administrator by right-clicking on the setup and select the option Run as Administrator.
Following these steps can help solve your problem.
Also Read: Sage 50 Cannot be started when Pervasive PSQL is not Running
Final Words!
In conclusion, all the solutions and the causes are mentioned that helps you in identifying and resolving Sage 50 the installation of the pervasive database has failed error. Do the step by step process to fix the issue.

Accounting Professionals & Specialized Experts
Want quick help from accounting software experts? Get in touch with our team members who can install, configure and configure your software for you. Proficient in fixing technical issues, they can help you quickly get back to work whenever you encounter an error in Sage software. Our team is available 24/7 365 days to assist you. To get in touch.
Frequently Asked Questions (FAQs)
What if I am using 2 versions of the Software and Remove one Pervasive Software Folder?
By removing the folder it affects one or both of the versions of Sage 50 in your account. As pervasive is one of the important parts of the Sage 50 software installation.
How to check for the Pervasive Version installed in the System?
To check the version, open the Control Panel, and then in the Programs list you get the pervasive listed with the name of ActianPSQL v12ServerEngineSP1. By this, you can easily identify the Pervasive Actian version and then accordingly install the Sage software.
What are few things that I have to do before doing anything or apply any solution?
The things are as follows:-
1. Firstly, take the backup of all your data
2. Restart your system to refresh it
3. Disable the antivirus, etc.
What to do if I am still having issues after doing all the Process?
After applying the solutions, you are still facing issues in the installation of the Pervasive database then you have to connect with the Sage helpdesk via email or live chat where you don’t have to wait in a queue.
Troubleshooting Sage 50 Accounts installations
Foremost inorder to ensure that the service is running correctly, stop and restart the service.
1. Start this by, right-clicking on the required services for the version of Sage Accounts that is being used: Sage Accounts v30. Sage 50 Accounts Service v30. Sage 50 Accounts Control v30. Sage Accounts v29.
2. Next click stop
3. Now right-click again
4. Finally click Start.
Understanding Pervasive Errors
There are some times, when certain error conditions might exist within your Pervasive data files. The Pervasive database engine reports these errors in order to the Estimating Management Console when performing data migration. In case the user encounters such error conditions, most of them result in the failure of the data migration process.