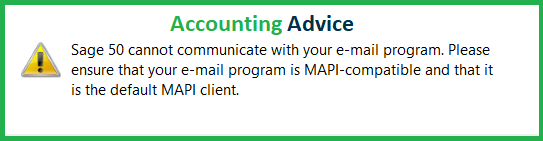
Sage 50 Cannot Communicate with your Email Program

In Sage Accounts you can send and receive reports & outlines through email, web-mail or Microsoft Outlook. Also, you can configure records to normally send email to specific email addresses from your Sage Accounts.
User Navigation
However, while working on Sage 50 accounting software, this error is encountered when a computer is unable to establish an association with the accounting software then most of the times users encounter an error text as, “Sage 50 cannot communicate with your Email program”. This error generally occurs when the user sends the invoice of clients through email from the Sage account. This error is associated with an error code which is usually a communication error and when the default mail is not configured. While using your email customers for sending email to clients, you may come across this kind of issues which is equal to a terrifying experience in sage. But you do need to worry much since our Sage technical support experts are proficient enough in solving any kind of error encountered in Sage product.
Point to Remember Before Fixing Email Issue in Sage 50:
- First of all, to send records through email you must work on SAGE 50 Email Setup
- You need to work with the supplementary
- Configure and Set-up your default email settings
- Modify the email settings of the document.
Steps to Fix Email Issue in Sage 50 Product
Total Time: 35 minutes
Solution I: Update the Latest Version of Sage 50
🔷 Go to Sage 50 software in your system
🔷 Press the Splash screen
🔷 Go to the Sample list or history of the used company file
🔷 Press on Help field from the menu bar list > Press on the About Sage 50 list in the drop-down menu
🔷 Verify the latest edition of the software you are using and Update them
Solution II: Verify for Compatibility of the Email Customers with Sage 50
🔷 In general, Sage 50 software is not supported in 64-bits emails customers
🔷 See that whether you have some 32- bit MAPI compliant email customers installed in your computers
🔷 Press on the File list and take your cursor to Office Account and click the About Outlook
🔷 Select to confirm whether the MS Office is 32-bit or 64-bit
🔷 If the problem it continues, please follow the next solution
Solution III: Email Issue from the Cloud Versions of the Email Customers
🔷 Type Control panel within the Start menu
🔷 Select the Default Program
🔷 Go to the computer defaults & Set program access
🔷 Press on the Custom list to enlarge it
🔷 Select the Choose a default email program and select the preferred email client from the option available
Read More-: Sage no Default Email Client Found
Unable to Email from Sage 50?
As Sage 50 is not exactly an email software, hence it requires assistance from another email client. In case you log in to a webmail account like Hotmail or Gmail through the web browser, then there are chances that it will not work, as it is not a true email client. In order to use these webmails, you will have to ‘set them’ within the email software.
As in the case of Outlook, we don’t have a click-to-run version as it is not supported by Sage 50. It is recommended by experts to use MAPI-compliant clients, like those of Outlook 2007, Outlook 2010 and Outlook 2013 in 32-bit. Likewise, the user can also utilize Windows LIVE mail. For this, it is advised to use the desktop version and not the web version.
Once it has been confirmed that the right kind of email has been installed, but you are still unable to receive or email MAPI-related error, then you need to follow the below steps:
- Start by confirming that the email client has been set up as the default email program in your system.
- Next, navigate to Control Panel > Default Programs > Set the Default Programs
- Now select the Email client
- Next, click on ‘Choose Default for this Program’.
- Ensure that the box of ‘Send Mail’ has been checked under MAPI, for example, check out the screenshot below for Outlook:
- In case this still fails to email, Shut out of Sage 50 and Outlook
- Next, go to the Control Panels
- Go to Programs
- Click on Features.
- Click select Sage 50 Accounting
- Click Change.
- You will be displayed with the message “ you currently have Sage 50 installed…” to which you need to click on OK.
- Select Add/Remove Programs components
- Click on Next Uncheck Add-in for Microsoft Outlook
- Click on Next.
- Repeat the steps all over again and re-add the checkmark for Add-in for Microsoft Outlook to have the Add-On reinstalled.
- Finally, email the transaction from Sage 50.
In case the above steps still fail to get you the required results, then you need to uninstall and reinstall the email software. However, once you take this route, you need to create a secure backup of the e-mail message first.
Issues when Trying to Send Emails
There are times when you might be faced with any of the following messages when trying to send emails:
- Unable to send all emails.’
- ‘ExtendedErrorCode.COMError: “Generic COM Error’
- ‘Failed to output to email’
- ‘Error with the address Unknown Error. Please check Windows Event Log for more detail
When You are Using Gmail or Yahoo
- You need to generate an app password
- In case of more doubts, you need to get in touch with a professional.
When You Use Microsoft Exchange Online
There are times when you might face the following message:
Unable to Send all Emails- Error with the address xxx: Unknown Error. When integrating with Microsoft Exchange
In order to resolve this, you need to follow the below steps:
- Before you can update your Sage 50 Accounts Email Settings, you must move your mailboxes to on-premise.
Step 1: To Create a Migration Endpoint
It is important to create Exchange remote migration endpoints before you perform the on-boarding and off-boarding remote move migration in an Exchange Deployment. This comprises the Connection Settings for an on-premise Exchange server which is running the MRS proxy service that is required to perform the remote move migrations both to and from Exchange Online.
Step 2: Enable the MRSProxy Service
Here are the steps within the Exchange Admin Center to set up the MRSProxy Service for the on-premise Exchange servers:
- Launch the EAC
- Go to Servers > Virtual Directories
- Click select on Client Access Server
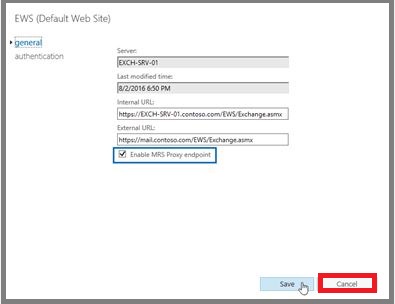
- Click Select the EWS virtual directory
- Click on Edit
- Click select MRS Proxy enabled checkbox
- Click SAVE
Step 3: To Use the EAC to Move Mailboxes
For this step, you need to use the remote move migration on Office 365 tab within the EAC on an Exchange server to move the existing user mailbox in the on-premise organization over to the Exchange Online organization or to move the Exchange Online mailboxes to the on-premise organization. Here are the steps:
Move on-Premise Mailboxes to Exchange Online
Here you need to use the remote move migration wizard within the EAC in the on-premises Exchange organization to transfer the existing user mailboxes from on-premise Exchange to the Exchange online:
- Go to the EAC
- Go to Office 365
- Go to Recipients
- Next move to Migration
- Click on Add +
- Now select Migrate to Exchange Online
- Go to the Select Migration Type page
- Now select Remote Move Migration
- Click on NEXT
- Go to the Select the Users page
- Click Add +
- Now select the USers page
- And Click Add +
- Select the on-premises users to move to Microsoft 365 or Office 365
- Click on Add
- Click OK
- Click Next
- Go to the Enter the Windows User account Credential page
- Enter the on-premises administrator account name within the On-premises administrator Name text field and enter the associated password for this account in the On-premises administrator password text field. For example, “corp\administrator” and a password.
- Now Click Next.
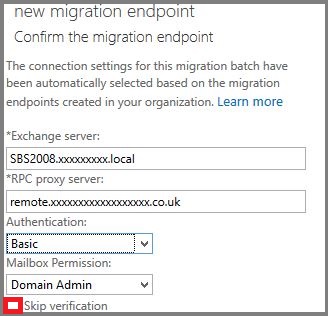
- Go to the Confirm the migration endpoint page
- Here, verify if the FQDN of your on-premises Exchange server has been listed once the migration endpoint has been confirmed by the wizard.
- Now click NEXT
- Go to the Move configuration page
- Here enter the name for the migration batch within the New migration batch name text field.
- Next, Use the down arrow to select the Target delivery domain for the mailboxes that are migrating to Office 365.
- In the case of most hybrid deployments, this is the main SMTP domain which is used for Exchange Online organization mailboxes. For example, contoso.mail.onmicrosoft.com. Verify that the Move primary mailbox along with the archive mailbox option is selected.
- Now click Next.
- Go to the start batch page
- Now select at least one recipient to receive the batch complete report.
- Now Verify that the Automatically Start the batch option is selected.
- Next, select the Automatically Complete the migration batch check box.
- Now Click New.
To Move Exchange Online Mailboxes to the on-Premises Organization
You have to utilize the remote move migration wizard within the EAC in Exchange Online to transfer the existing cloud mailboxes to the on-premises Exchange organization:
- Go to the EAC,
- go to Office 365 > Recipients > Migration.
- Click Add, and then select Migrate from Exchange Online.
- Go to the Select the Users page,
- Now select Select the users that you want to move.
- Now click Next.
- Go to the Select the Users page,
- Now click Add and then select the Exchange Online users to move to the on-premises organization,
- Now click Add
- Click OK.
- Click Next.
- Go to the Confirm the migration endpoint page and verify that the FQDN of your on-premises Exchange server is listed when the wizard confirms the migration endpoint. For example, “mail.contoso.com”.
- Click Next.
- Go to the Move configuration page,
- Now enter a name for the migration batch in the New migration batch name text field.
- Next, enter the target delivery domain in the Target delivery domain for mailboxes that are migrating to Office 365 field.
- In the case of most hybrid deployments, this is the primary SMTP domain used for both on-premises and Exchange Online organization mailboxes. For example, contoso.com.
- Select whether to also move the archive mailbox for the selected user and enter the database name you want to move this mailbox to in the Target database text field. For example, Mailbox Database 123456789.
- Click Next.
- Go to the Start the Batch page,
- Click select at least one recipient to receive the batch complete report.
- Now Verify that Automatically start the batch is selected,
- Now select the Automatically complete the migration batch check box.
- Finally, Click New.
Step 4: Remove Completed Migration Batches
Once your mailbox moves have been completed, you need to remove the completed migration batches in order to minimize the likelihood of errors if the same users are moved again.
In order To remove a completed migration batch:
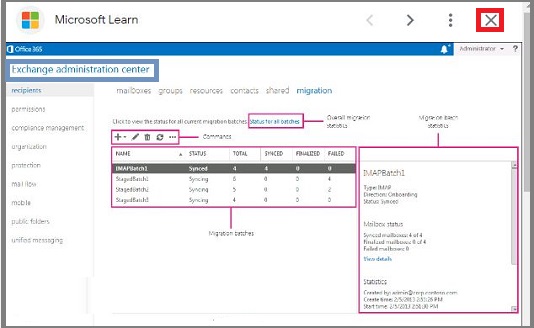
- Launch the EAC and go to Office 365 > Recipients > Migrations.
- Now Click a completed migration batch
- Click Delete
- Go to the deletion warning confirmation dialogue
- Now click Yes.
Step 5: To Re-enable offline Access for Outlook on the Web
Offline access in Outlook on the web (previously known as Outlook Web App) allows users to access their mailbox when they’re not connected to a network. If you migrate Exchange mailboxes to Exchange Online, the users have to reset the offline access setting in their browser to use Outlook on the web offline.
A Different Kind of Error
For the ‘other’ kind of email problems, you need to follow the below steps:
- Restart your computer.
- Make sure you run both your Sage software and Outlook as admin.
- To do this, close both then right-click each desktop icon and click Run as administrator.
- Now Check if you’re using a compatible version of Microsoft Office.
- Next, Check if you have installed all required updates for Sage 50 Accounts or Sage 50 Payroll.
- In case you are not using Microsoft Outlook, check if your SMTP settings and webmail password are correct.
- Make sure that you can log into your email service provider’s webmail account, and that it hasn’t been blocked by your provider.
- In case you are having issues with a customized layout, try a standard layout. If a standard layout emails successfully, try editing the standard layout and recreate your changes.
- Go to your software
- Now click Help
- Next, click About.
- Under System Details in the column on the right, scroll down and check the status of Microsoft Office.
- If this displays n/a, first try an Office Online Repair. If this doesn’t resolve the issue, you must uninstall Office and then your Sage software,
- Now reinstall them in the same order to establish a connection between the software.
Error: ‘Unable to communicate with Microsoft Outlook as you are running Sage 50cloud Accounts as a Windows Administrator
There are times when you might encounter an error and receive a message like the below when trying to send reports or layouts to email in Sage 50cloud Accounts v27.2 and above.
- ‘Unable to communicate with Microsoft Outlook as you are running Sage 50cloud Accounts as a Windows administrator and running Outlook as a user with a lower level of access.
- Please either restart Sage 50cloud Accounts and run as a standard user or restart Outlook using the Run as administrator option.’
The main cause of this error can be in case you are running a Sage 50 cloud Account as a Windows Administrator but are operating Microsoft Outlook using Standard Level of Access.
In order to solve this, both Sage 50cloud Accounts and Microsoft Outlook must be run within the same level of access. It is advised you run both as an administrator:
- Start by Right-clicking the program shortcut,
- Now click Properties.
- Next, Click the Compatibility tab.
- Go to Settings or Privilege Level,
- Now select Run this program as an administrator check box.
- Finally, Click OK to open the software.
If this cannot be performed, then you should make sure that neither program is being run as an administrator by following the steps above and clearing the check box.
Unable to Send all Emails Error with the address xxx: Unknown Error
When this occurs you need to follow the below steps:
Check your Version of Microsoft 365
There is a chance that the Microsoft Office 2010, is not compatible with Sage 50 Accounts v28 or above. For this you need to upgrade Microsoft 365 to a more recent version, then try emailing your layout again in Sage 50cloud Accounts.
Creating a New Signature in Outlook
After the signature has been created, you need to apply it to your layout in your program:
- Go to the Sage 50 Accounts.
- Go to the menu bar
- Now click Settings,
- Next, then click Email Defaults.
- Now Confirm your Email Program is set as Microsoft Office Outlook.
- Click the tab for the layout type you wish to apply as a new signature to, for example, Invoice.
- Next, Click the drop-down menu to Override Default Outlook Signature and point to the new signature you have just created.
- Repeat step 4 for any other layout types, for example, Statements.
- Click Apply and then select the check box for the layouts you want to apply these settings to by expanding the boxes to select individual layouts.
- Click OK
Nothing happens when Trying to E-mail
There are times and cases when nothing happens when trying to email from Sage 50. Or the same result occurs when you are only able to email Via Outlook closed. In this case, you will need to follow the below steps:
Method 1 – Close Microsoft Outlook
- Start by Closing Outlook.
- Now Try to send an email from Sage 50 while keeping Outlook closed.
- In case you are still unable to email with Outlook closed, go to Method 2.
Note: To avoid the hassle of having to close every time, you can either disable User Account Control-UAC or make the program run as an administrator by default.
Method 2 – Install Updates/Reinstall Sage 50 Email Writer
- Go to Services,
- Next, Check for Updates from the top menu of Sage 50.
- Now Close the program and any updates to install.
- Now Restart the computer and allow any Windows Updates to apply.
- Finally, Verify you can email from Sage 50
In case you are still unable to email even after verifying Sage 50 and Windows are updated as well, then you need to remove and reinstall the Sage 50 e-mail Writer.
Emailing Invoices in Windows 8 / 10 with Windows Live Mail
There are cases when the user might be trying to email an invoice with Sage 50 in Windows 8 but does not have an email program that can work with Sage 50. Likewise, My email program is 64-bit and I want to email invoices with Sage 50 using my Windows Live email, but Sage 50 is giving an error message and no emails are also being able to send. This can be because of any of the following reasons:
- Sage 50 is not an email program as it utilizes a standard Microsoft protocol called MAPI (32-bit)
- Windows Live is available in two editions: web version or software desktop
- Here, only the software desktop version is MAPI compliant
Solution 1
- To Use the webmail feature instead
Solution 2
- Start by Downloading Windows Live Essentials which also comprises Windows Live Mail (software desktop).
- During the process of installation, ensure Mail is selected within the window when asking you “Choose the programs you want to install”
- Next, you need to Set Windows Live Mail as the default MAPI email software:
- Now Type the Windows+X key combination on your keyboard to start up the Windows 8 Start Menu equivalent.
- Next, choose Control Panel.
- Now Go to Programs > Default Programs > Set Default Programs.
- Next, Select Windows Live Mail
- Now click Choose Defaults for this Program
- Next Check tick the box for Sent Mail within MAPI.
- Note: In case you are unable to see the MAPI option, then this means that your email program is not MAPI compliant. Also, make sure that the email program is 32-bit. Sage is only compliant with MAPI 32-bit. In order to verify if it is 32-bit, launch Windows Live Mail then open the task manager.
- Open Windows Live Mail. View the contact’s profile, check the Primary email address selection dropdown, and depending on the email type (Personal or Work) choose a category. Relaunch Sage 50 and Windows Live Mail.
Note: The contact you need to email from Sage is required to be present in your list of Contacts in Windows Live Mail. In order to set up your email with Windows Live Mail, Sage advises you to use a Microsoft Hotmail/Live/Outlook email account. Or, you will need to import all your contacts into Windows Live Mail first. Follow the instructions from Windows Live Mail.
- Start by Relaunching Sage 50 and Windows Live Mail.
- Next Start emailing invoices from Sage 50 as normal.
- While emailing, Windows Live will have a pop-up that will ask for verification to authorize emailing. Likewise, you may also be asked to enter a security answer).
In case you were able to email from Sage 50 using Windows Live Mail with Windows 7 but now it is not working:
- Start by Opening Control Panel,
- Go to default Programs
- Next, Set your default programs
- Now select Windows Live Mail (on the left side of the screen)
- Next, select Set this program as default (on the right side of the screen).
- Finally, Restart computer.
- And you are done.
Note: If you are trying to email with Windows Live Mail, you need to add the contact to your contacts in Windows Live Mail.
Also Read-: Sage 50 Microsoft Office 365 Integration-Email Setup
Final Words
Hope you are able to resolve your email error in Sage 50 after following the solution given. But in case, you are working in Sage email account and the errors continue and still struggling to fix the error, then immediately get in touch with our technical specialist. They are totally reliable, skilled and friendly in dealing with any kind of errors encountered in Sage 50 accounts. They make sure to provide the best solution for any errors in sage and solve them in very limited time. To contact our technical member, you can pursue various medium of communication. Either you can directly contact our www.accountingadvice.co the Sage 50 helpline number or you can also get in touch through Online Sage Chat Support.
Accounting Professionals & Specialized Experts
Want quick help from accounting software experts? Get in touch with our team members who can install, configure and configure your software for you. Proficient in fixing technical issues, they can help you quickly get back to work whenever you encounter an error in Sage software. Our team is available 24/7 365 days to assist you. To get in touch.
Frequently Asked Questions(FAQs)
What are the Different Ways to Email Sales Invoices in Sage 50?
You can do any of the following , if you want to email sales invoices in Sage 50-
🔷 You can email invoices one by one from the Sales/Invoicing window. To do this, click Email in the Sales/Invoicing window. Sage 50 will email the invoice to the destination specified and will also save the invoice.
🔷 You can email a batch of invoices from the Sales/Invoicing window, in one session
🔷 You can also email a batch of invoices, in one session, from the Select a Report or Form window.
How to Get the Email Server Settings for Microsoft Outlook?
Please follow the below-mentioned steps-
🔷 Navigate to Control Panel
🔷 Click on Mail
🔷 Click Email accounts
🔷 Select your email account
🔷 Click on Change
🔷 You will get the SMTP Address of the Outgoing mail server
🔷 Now click on More Settings
🔷 Go to Advanced option
🔷 Next, go to the OUTGOING MAIL SERVER SMTP. You will get the port number you need.