How to Create Sage 50 Backup

The Sage 50 software is well appreciated for its highly user-friendly interface & improved features. It has really made lives easier for businesses and accounting professionals and saved a lot of their time & effort. However, as per the feedback received from a section of Sage 50 users, there are some account-related features they are not quite familiar with. Some of them have informed that they have missing, damaged, or irrecoverable data /transactions in their company files but are not sure how to Create Sage 50 Backup properly.
User Navigation
- How to Create a Back up in Sage 50?
- Back up your Data
- To Restore a Sage 50 Backup
- Make a Cloud Backup in Sage 50
- Final Words!
- Accounting Professionals & Specialized Experts
- Frequently Asked Questions(FAQs)
- Is it Necessary for All the Users to Log Out Before Starting the Backup?
- Where Should I Save the Sage 50 Back Up File?
- If I Find Any Issues in Restoring a Back up in Sage 50, How Can I Contact the Sage Support team?
- How to Create a Backup in Sage 50?
- What is the Sage 50 Automatic Backup Scheduler?
- How to Transfer Sage 50 Company Data Backup from one Computer to another?
Restoring to an earlier backup is often one of the most tried and tested solutions when you have missing, damaged, or irrecoverable data /transactions in your company. If you are finding it difficult to restore a backup in your Sage 50 application, you have landed at the right place. In this blog, we will show you how to do it easily in Sage 50
Oh wait..let’s first get to know how to create a company back up..
How to Create a Back up in Sage 50?

Please find the steps mentioned below-
- Log into the Sage 50 company you want to take backup of. If you are using Sage 50 Quantum or Premium, log in under sysadmin, in single-user mode.
- Click File
- Go to Backup. Alternately, you may also navigate to the toolbar on top of the home screen and click the backup icon
- Go to the window named Sage 50 Accounting – Backup
- Enter a name for the backup file. For easy recognition later on, you may include the date as a part of the file name
- Specify the folder/location where you wish to keep the backup.
Also Read-: How to Fix Sage 50 Unable to Open Company File
Please note-
- Do not keep this backup file in the .SAJ folder. This is the default backup location used by the software
- The software saves the path of the last-used backup and makes it the default path for next backup
- Make sure not to overwrite an existing backup.
- Click OK to proceed with the backup.
Procedure to Restore a Back up in Sage 50:

Here is a step-by-step procedure to restore a back up in Sage 50-
- Navigate to File
- Click on Restore
- Click Browse
- Choose the desired backup
- Click Open
- Click Next to proceed
- Now choose your preferred method to restore:
- Overwrite an Existing Company or existing company data
- Create A New Company or a new company using the restored data
- Click Next
- Choose any of the restore options:
- Customized Forms
- Company Data
- Business Intelligence Reports or Intelligence Reporting Reports
- Click Next
- Check the restore options before proceeding
- Click on Finish
- Once the restore gets completed, the company will open.
Back up your Data
- Launch the required company,
- Now click on File
- Next, click Back up.
- Note the suggested file name or edit the name as needed.
- Click on Browse
- Select a location to save the file to,
- Now click OK.
- If you wish to back up other files such as reports and layouts, select them from the list or click on Select all file types to include in the backup.
- It is recommended that you backup data daily but you can back up layouts and reports can be backed up less frequently.
- Click OK, then if prompted to check your data:
- Go to Sage 50 Accounts
- Click File
- Click Maintenance
- Click Check Data.
The Check Data option examines the data files to detect errors and groups any issues into the following categories:
- Errors – The user needs to stop processing until they have been resolved and no longer appear
- Warnings – It is recommended that the user fix these before continuing
- Comments – These are for information only, it is recommended you check these from time to time
Next Steps
When there are no problems reported
- In case there are no problems, a message is displayed, click OK.
- Click Yes
- Click OK
Back up Location
When the user selects the location that you wish to back up to, the software will remember this. If you require to locate a backup to restore, then you can browse the path shown in your backup window:
Back-Up Your Company
- Log into the company you want to backup.
- You need to be in single-user mode under sysadmin If on Sage 50 Premium or Quantum.
- Next Click on File then Backup
- One can also click on the Backup icon, which looks like a file cabinet from the toolbar located on the top of the Home screen.
- In the ‘Sage 50 Accounting – Backup’ window, enter the file name.
- It is a good idea to include the date as part of this name (ex. UC141222)
- Next, choose the folder where you wish to save the backup
- DO NOT save the file location within the.SAJ folder as this is the folder that the software backs up.
- The last-used backup file path is saved and becomes the default for the next backup
- Do not overwrite an existing backup until you know for sure that is what you wish to do.
- Finally, Click OK to start the backup
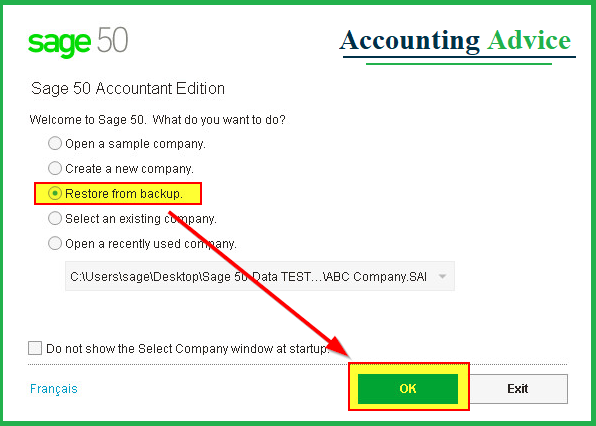
To Restore a Sage 50 Backup
- Launch Sage 50.
- Now select File then Restore
- Next, Click Browse and go to wherever your backup file (.PTB file) is located.
- Click Open
- Click Next
- Choose the desired restore method:
- Overwrite existing company data or An Existing Company
- Create a new company using the restored data or A New Company.
- Select this option if you wish to restore the backup to a new folder.
- Doing so will not overwrite your existing data.
- Click Next
- Choose the desired restore options (choose all in most cases):
- Company Data
- Customized Forms
- Web Transactions
- Intelligence Reporting Reports or Business Intelligence Reports
- Note: If you wish to edit the company name, this can be done by selecting Maintain then Company Information.
Make a Cloud Backup in Sage 50

The user can make a cloud backup in Sage 50 if they own a subscription to Office 365 Business Premium or higher. While doing this can create a backup which is saved to the Sage50 cloud using Office 365. To enable Office 365 integration with the Sage 50c products, one must also be a global administrator of the Office 365 account. Additionally to backing up your company file to the cloud, this feature also backs up archive copies of the company file to the cloud, too.
In order to make a cloud backup in Sage 50 once:
- You need to select “File| Back Up…” from the Menu Bar.
- In the “Back Up Company” window that opens, click the “Back Up Online” button.
- If needed, you can also click “Yes” in the “User Account Control” window that opens to let the program configure your computer.
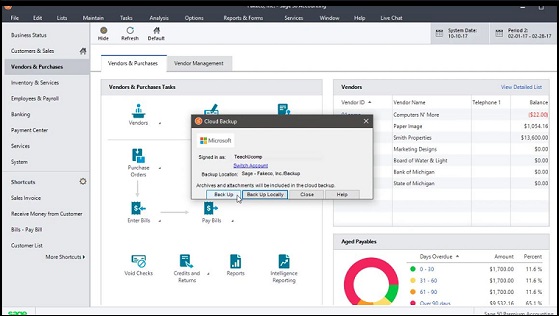
- At this point, a “Cloud Backup” window is launched.
In case you have already signed in to Office 365 within Sage 50c, your account will appear within this window. If you have not yet signed in using your Office 365 global admin account, click the “Sign In” button to sign into Office 365 within the “Sign in to your account” window that is launched. Finally, click the “Sign in” button in this window to finish signing in.
In case this is the first time signing in using your Office 365 account, you will also be required to click the “Allow” button as displayed on the screen that appears and lists the permissions that you must grant to Sage 50c to access Office 365. Once you sign in, your account will appear within in the “Cloud Backup” window. Likewise, you can also click the “Switch Account” link in this window to use another Office 365 account, if required:
- Before the user creates a cloud backup in Sage 50, they need to have a subscription to Office 365 Business Premium or higher.
- In order to enable Office 365 integration with your Sage 50c products, the sign-in account used should also be a global administrator of the Office 365 account.
- In order to make a cloud backup in Sage 50, click select “File| Back Up…” within the Menu Bar.
- This is with the “Back Up Company” window that opens”.
- Next, click the “Back Up Online” button.
- If needed, click “Yes” in the “User Account Control” window to let the program configure to your system.
- Your account will appear within the “Cloud Backup” window that soon launches if you have already signed in to Office 365 within Sage 50c.
- If you have not signed in using your Office 365 global admin account, click the “Sign In” button to sign into Office 365 within the “Sign in to your account” window.
- Now, click the “Sign in” button within this window in order to finish signing in.
- If this is the first time signing in using your Office 365 account, you need to also click the “Allow” button on the screen that appears and lists the permissions you need to grant to Sage 50c to access Office 365.
- Once you have signed in, your account appears in the “Cloud Backup” window.
- Now, You can also click the “Switch Account” link in this window to use another Office 365 account, if required.
- To create the cloud backup, click the “Back Up” button within the “Cloud Backup” window.
- Now, click the “OK” button in the warning message once you have ensured all other users have logged out.
- The company file is now backed up and its progress appears in the “Back Up Company” window.
- Once the backup finishes,
- Finally, click the “Close” button within this window
Related Article: Sage Error: Can’t Connect to Your Sage 50 Company Data Location
Final Words!
We hope the sequential steps mentioned above would help you a lot in restoring a back up of your data in Sage 50. If you are still facing any difficulties in carrying out the above-mentioned steps, you may speak to the authorized Sage experts, anytime you want.

Accounting Professionals & Specialized Experts
Want quick help from accounting software experts? Get in touch with our team members who can install, configure and configure your software for you. Proficient in fixing technical issues, they can help you quickly get back to work whenever you encounter an error in Sage software. Our team is available 24/7 365 days to assist you. To get in touch.
Frequently Asked Questions(FAQs)
Is it Necessary for All the Users to Log Out Before Starting the Backup?
Yes. You should select the option to log out all users before starting the backup process. If you do not select this option, the backup will not start if someone is using Sage 50 at the time of the scheduled backup. If you check this box and a user is having Sage 50 open at the time of the scheduled backup, he will be logged out without any warning and he will lose unsaved work, if any. Therefore, you should inform all users not to leave Sage 50 open when they wind up for the day.
Where Should I Save the Sage 50 Back Up File?
You can specify any location to keep your back up file. However, if you are not having an off-site backup, you must save the back up to another drive, preferably on a different computer. By not having the backup on the computer where your Sage 50 data is kept, you will be protected in case of a theft or hardware failure.
If I Find Any Issues in Restoring a Back up in Sage 50, How Can I Contact the Sage Support team?
If you have any queries or are finding any difficulties while restoring a backup in Sage 50, you may contact 1800 964 3096 Sage 100 Integration PVX Errors Reference the Sage Support team for the instant help.
How to Create a Backup in Sage 50?
Please find the steps mentioned below-
🔹 Log into the Sage 50 company for which you need to take a backup. If you are using Sage 50 Quantum/Premium, you will have to log in as sysadmin, in single-user mode.
🔹 Go to the File section
🔹 Go to Backup. You can also click on the toolbar on the home screen and click on the backup icon
🔹 Go to the Sage 50 Accounting – Backup window
🔹 Enter a name for the backup file. You can include the date in the file name. This would help you locate it easily later on
🔹 Specify the location where you need to store the backup
Please note-
• do not store this backup file in the .SAJ folder. This is the default location used by the software to keep the backup file
• The software saves the path of the last-used backup and makes it the default path for the next backup
• make sure an existing backup does not get overwritten
🔹 Click OK to initiate the backup
What is the Sage 50 Automatic Backup Scheduler?
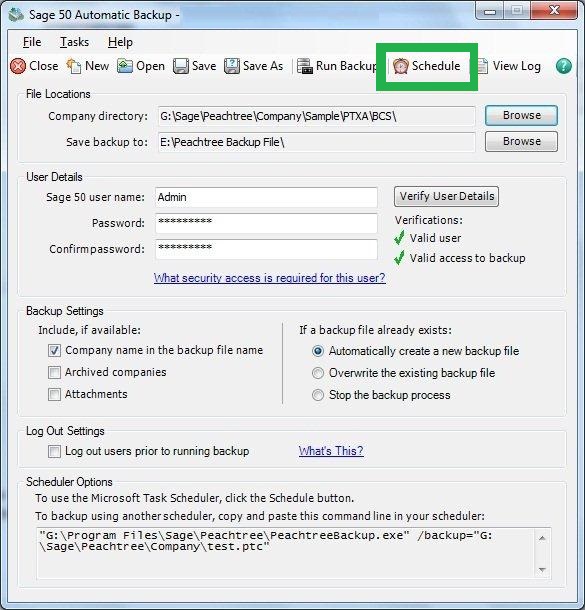
Remembering to take a backup and scheduling a convenient time for back up, when no one is using the software, is very important. This is where the Sage 50 Automatic Backup Scheduler can come to your rescue. It provides an affordable and reliable way to go back to a particular point in time and to look at a data backup created by Sage 50.
How to Transfer Sage 50 Company Data Backup from one Computer to another?
Here are the steps to follow-
🔹 Take a proper backup of your company data
🔹 To do this, log in to the relevant company
🔹 Now go to File
🔹 Click the Backup option
🔹 Store it on an external device.
🔹 Next, connect the device to the computer where you need to transfer the data
🔹 Click on Next.
🔹 Browse to the location where you have stored the backup file.
🔹 Click Open
🔹 Give your file a suitable name
🔹 Click Save
🔹 Click Next
🔹 Click Finish to end the procedure
