Apply AR (Accounts Receivable) Prepayment to an Invoice in Sage 100 ERP
Updated On: May 15, 2025 10:56 am

The Sage 100 ERP is one important platform designed by the Sage family that provides useful functions to go beyond accounting and helps businesses boost revenue. The software provides functions related to accounting, distribution, manufacturing and other fields related to the industry. Not a surprise that Sage 100 ERP has been extremely popular among the business community of late.
User Navigation
Accounting Professionals & Specialized Experts
Want quick help from accounting software experts? Get in touch with our team members who can install, configure and configure your software for you. Proficient in fixing technical issues, they can help you quickly get back to work whenever you encounter an error in Sage software. Our team is available 24/7 365 days to assist you. To get in touch.
Many times, a scenario arises where we have to apply prepayment to an invoice in Sage 100 ERP. Many Sage users have informed that they were finding it difficult to apply prepayments to an invoice in Sage 100 ERP. In this blog, we are going to address this. We will discuss a step by step procedure to Apply AR Prepayment to an Invoice in Sage 100 ERP.
Before moving into the procedure, let’s have a look at the basics .
What are Prepayments?
A prepayment is used to adjust accounts for payments made before receiving the benefit. Examples of prepayments include:
- Insurance premiums.
- Rent paid in advance.
- Legal retainer fees.
How to Create an AR (Accounts Receivable) Prepayment Entry in Sage 100 ERP?
Please follow the below mentioned steps:
- Open Sage 100 ERP.
- Go to the Accounts Receivable section.
- Click on the Main menu.
- Now choose the Cash Receipt Entry option.
- The Cash Receipt Entry window will come up.
- enter the Customer number with the check number.
- in the Amount Received field, enter the amount prepaid.
- Click on the Lines tab.
- Enter a future Invoice Number.
- Click on a tab.
- A prompt will ask you whether the concerned transaction is a prepayment.
- Click on Yes.
- Click on the Accept button in order to record the transaction.
- A Pre-payment entry will be created for a future invoice.
Procedure to Apply Prepayments to an Invoice in Sage 100 ERP
To apply AR Prepayment on Invoices, follow the below mentioned steps:
- Open Sage 100 ERP.
- Go to the Accounts Receivable section.
- Click on the Main menu.
- Now choose the Cash Receipt Entry option.
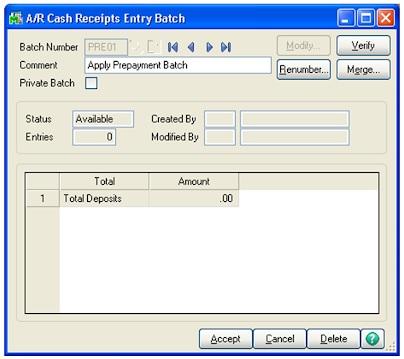
- Click to open the A/R Cash Receipts Entry Batch screen.
- Enter the relevant details such as Comments, Batch number and so on.
- Click Accept.
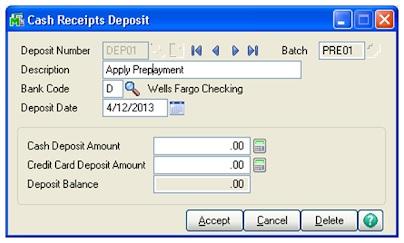
- The Cash Receipts Deposit screen will appear.
- Here, enter relevant details such as Description, Deposit number, Bank Code, Deposit date, etc. leave the fields Credit Card Deposit Amount and Cash Deposit Amount.
- Click on Accept.
- The Cash Receipt Entry screen will come up.
- Here, type in the Customer Number and the Check Number. Leave the Amount Received field as 0.
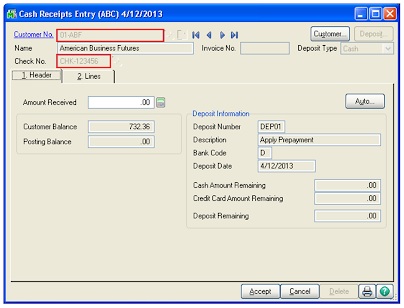
- Now click on the Lines tab
- on the first line, choose to apply the existing prepayment
- in the Amt Posted field, enter the amount to apply.
- In the second line, specify the invoice to which you need to apply the prepayment
- in the Amt Posted field, enter the amount to be paid
- Click on the Accept button.

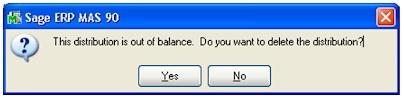
Please Note: Make sure that the Posting Balance and Total Posted fields are zero. If not, then the following error message will appear.
In the discussion above, we have shown how to apply prepayments to an invoice in Sage 100 ERP. If you are still having any difficulties while performing these steps or if you have any queries, you may consult with some of the authorized Sage experts 1800 964 3096.
Frequently Asked Questions:
What is the Procedure to Install Sage CRM with the Sage 300 ERP?
Here are the steps to follow:
1. Run your installation DVD.
2. Choose the software to install.
Please Note– If you are installing from a DVD of Sage ERP Accpac 6.0, choose to install the Sage CRM application for Sage ERP Accpac. Next, choose the Sage ERP Accpac Integration designed for Sage CRM.
If the installation is from a DVD of Sage CRM 7.0, choose to install the Sage ERP Accpac Integration. Next, proceed to install the amalgamation module for Sage CRM.
1. The window named amalgamation module for Sage CRM 7.0 will be displayed on your screen.
2. Press next to continue.
3. Choose Sage CRM install to combine with Sage ERP Accpac.
4. Click next.
5. Select the installation and upgrade options.
6. Click next.
7. Click on Sage ERP Accpac version /update trajectory.
8. The SQL Database Server Sign in information window will be displayed on your screen.
9. Verify your User ID and server details.
10. Enter the password.
11. The installation process of the Sage ERP Accpac Integration would commence now.
12. Press Next.
13. Press yes, if prompted to stop the IIS.
14. Once complete, click Finish and restart the system.
What causes the Sage 100 ERP Error 65?
Many internal issues may lead to the occurrence of this error message. The two most prominent reasons are as follows:
1. Element exists already.
2. Mandatory elements missing in Windows.
To fix the Sage 100 ERP Error 65, I am asked to Restart the Explorer.exe file. How to do this?
Please follow the steps below:
1. Click ctrl + shift + esc on your keyboard.
2. The task manager window will open up.
3. In the Processes list, search for explorer.exe.
4. Right click on it and choose End Task.
5. Go to the File option.
6. Click on New Task.
7. The Run Window will appear on your screen.
8. Type explorer.exe on it.
9. Hit the Enter key.
10. Restart the explorer.exe process.
11. The windows explorer will resume.
12. Check if the issue has been resolved by now.
Why are Prepayments Important for My Business?
Prepayments allow you to adjust your accounts against payments/invoices made in advance or against payments made in arrears. This enables you to divide the amount you paid or invoiced across the months covered by the payment/invoice. You can get a better understanding of your monthly profits by expanding the value over a period of time.