Use Excel as a General Accounting Ledger
Updated On: September 19, 2025 11:55 am

We all know that the Microsoft Excel is a powerful tool that can be utilized for various functions when working an operation. There are however various small businesses that require just a few transactions for which Excel can be a great asset in order to execute rapid results. There are experts out there who know how to utilize Excel and make it work like accounting software for them! No kidding on that one.
User Navigation
Accounting Professionals & Specialized Experts
Want quick help from accounting software experts? Get in touch with our team members who can install, configure and configure your software for you. Proficient in fixing technical issues, they can help you quickly get back to work whenever you encounter an error in Sage software. Our team is available 24/7 365 days to assist you. To get in touch.
This is not surprising, as Excel has all the required tools that are necessary to create and maintain the General Ledger. However, there is no denying the fact that one does require an almost-expert understanding of the way to use the tool. There are various start-ups and small-business ventures that do not have the capital to invest in accounting software; for these Excel is an excellent place to get ‘more than the basics’ done right away. So, here we are on how to use excel as a general accounting ledger. Let us explore some of the top tips on the same:
Excel As the General Ledger
There are various reporting needs according to the kind of business you are running. For this, you need to start by establishing a precise bookkeeping process inorder to determine the accounting metrics that are required based on the business type.
- A simple record-keeping setup needs to be put to place that includes different columns for the transaction date, transaction description, and a reference number, such as an invoice or check numbers.
- The next columns should comprise the list of each of the accounts that needs to be used during the year.
- Also, you need to be clear in your thinking regarding the selection of the accounts, as going back to retrace an aspect can be quite an ordeal.
- The Income statement accounts go up on the Left to Right and this should be the first accounts listed.
- Next is the Asset Accounts followed by the Liability accounts and finally the Equity Accounts if any.
As most might be knowing, the General Ledger comprises double entry bookkeeping in order to keep track of all the transactions that have taken place in the organization. However, it is important to have a proper understanding of the concept before you start to use the Excel as a General Ledger. Also, the Double-entry book-keeping depends greatly on entering both the Debits and the Credits for the transactions. This is to ensure that the books are balanced.
Double Entry Bookkeeping In Excel
In case it is a new company we are taking into account, the first transaction will most likely comprise the equity invested in the organization. For instance, an entrepreneur wants to open a machine shop. For this she has $750,000 from savings to launch the business and opens a business checking account at her local bank with the funds she has managed to save.
With the help of the Double entry bookkeeping, the entrepreneur knows that this particular transaction will increase the cash account of the company, also known as the Debit Entry. This will be offset by an increase in the equity account of the owner also known as the credit entry. With the help of the Excel system all the debit entries can be recorded as ‘Positive Values’. Likewise all the Credit entries can be recorded as Negative values.
From the example above regarding the entrepreneur, she should enter the transaction date and a description such as “Capital Investment” into the first line of the spreadsheet. She should then put a positive $750,000 entry into the “Cash” account column of the spreadsheet, and a negative $750,000 entry into the “Owner’s Equity” account column of the spreadsheet. In order to verify the numbers, Jane should use Excel’s sum formula to make sure that all of the entries on each row sum to zero dollars.
Now all the entrepreneur needs to do is to continue to enter a line for each transaction. If she purchases equipment with the company cash, she will enter a transaction to show a debit, or positive entry, to the “Equipment” account column, and credit, or negative entry, to the “Cash” account column. If she sells machining services to a customer, she would record a credit to the “Revenue” account, and a debit to an “Equity” account.
Lastly, she should make sure that each account column should be summed at the bottom of the spreadsheet. The sum of all of the income accounts can be added together to calculate current net income. Other columns to be calculated can be configured as required, such as total assets, total liabilities, and total equity.
Also Read: Sage 50 2023 Cannot Export to Excel
How to Create a General Ledger in Excel from the General Ledger Data?
In order to create General Ledger in Excel from the GL data you will have to :-
Step 1: Create General Journal Data
- Create the five headings in the Excel.
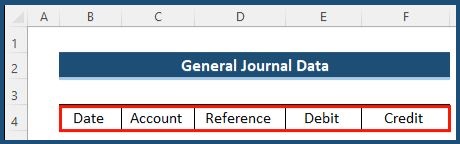
- Next click select the range of cells B4 to F4.
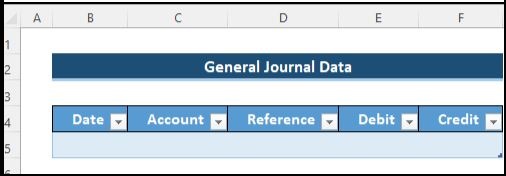
- Navigate to Insert tab on the ribbon.
- Go to Table Group and select Table.
- Now Create Table dialog box will appear.
- Ensure you check on My table has headers.
- Finally, click on OK.
- Now a table is created.
- Now add the company’s transaction along with the specific date.
- Finally, we will get the following general journal data.
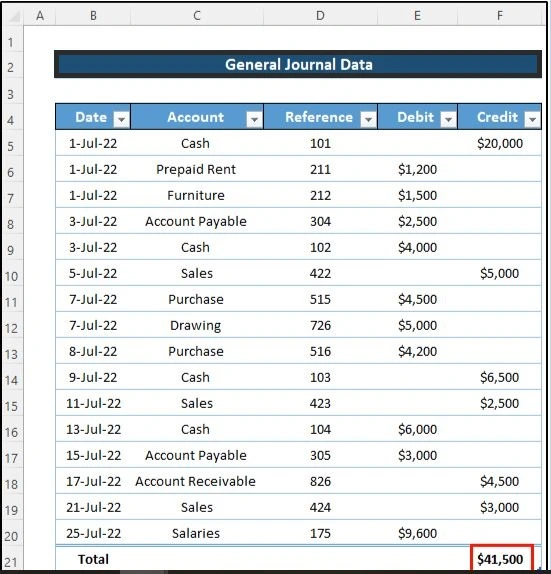
- Now we need to add the Sum of the debit and credit columns.
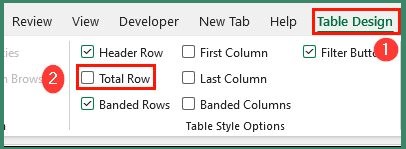
- For this, select the table, this will open up the Table Design tab on the ribbon.
- Select the Table Design tab on the ribbon.
- Now, select Total Row within the Table Style Options group.
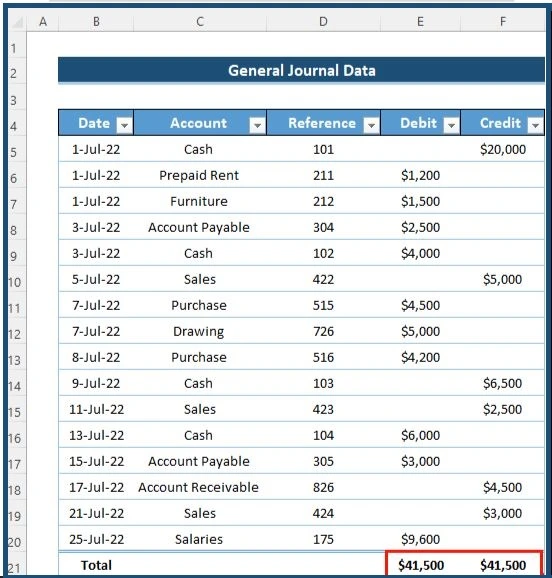
- This will create the total of the last column. Like below:
- Next, go to, the Debit column, here you will get a data validation button.
- Now, you can select the Sum option.
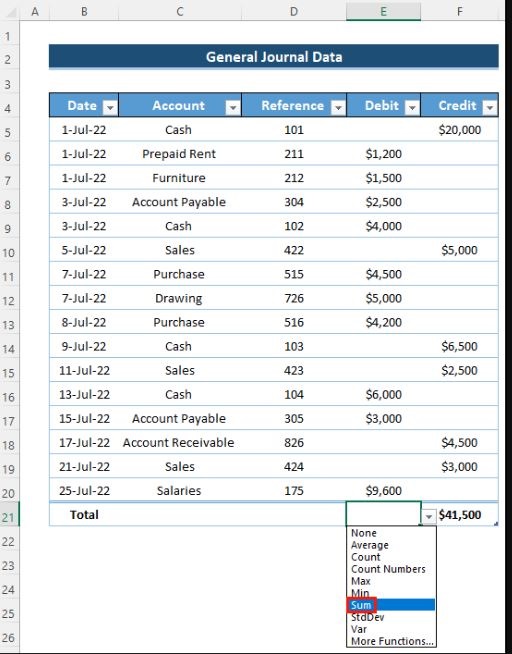
- This will result in the creation of the total of the debit column like below:
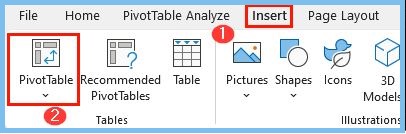
Step 2: To Create the Pivot Table
- Start by going to the Insert tab in the ribbon.
- Next, select PivotTable from the Tables group.
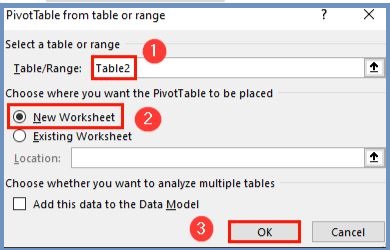
- Start by selecting the table or range.
- Next, select the New Worksheet where you want to put your PivotTable.
- Lastly, click on OK to apply.
- This will launch the PivotTable Fields dialog box in the new worksheet.
- Next Select all the available options.

- This will create a pivot table from the general journal data.
Step 3: To Modify Pivot Table
- Start by changing the report layouts.
- To do this, you need to select the pivot table, this will open up the Design tab on the ribbon.
- Click Select the Design tab on the ribbon.
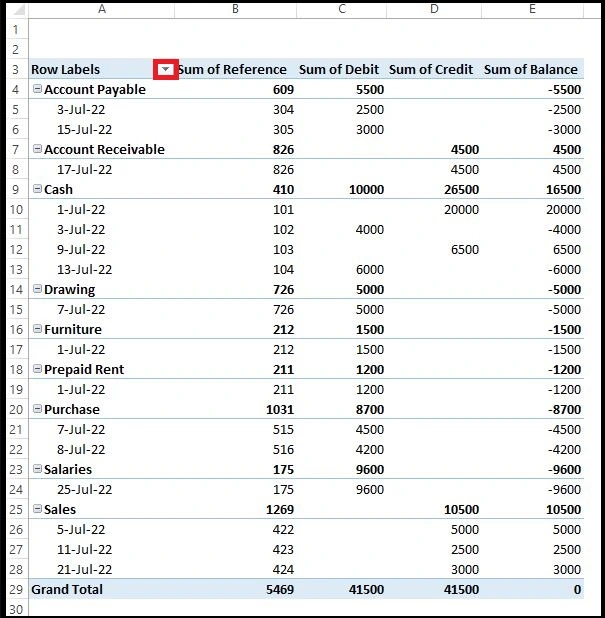
- Next, select Show in Tabular Form from the Report Layout drop-down option from the Layout group.
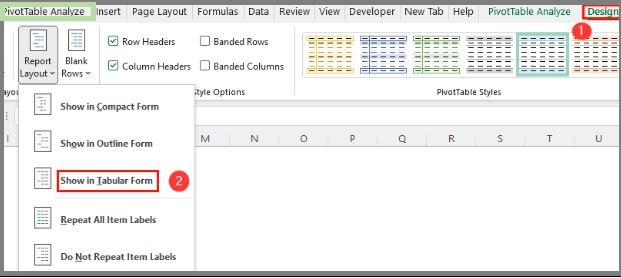
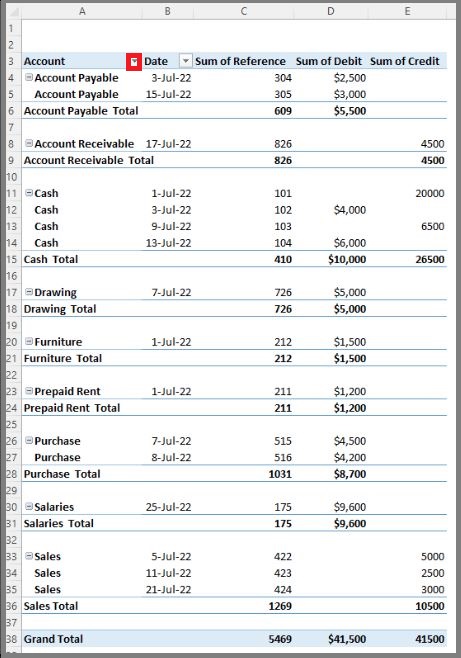
- This will set the pivot table in a tabular form like below:
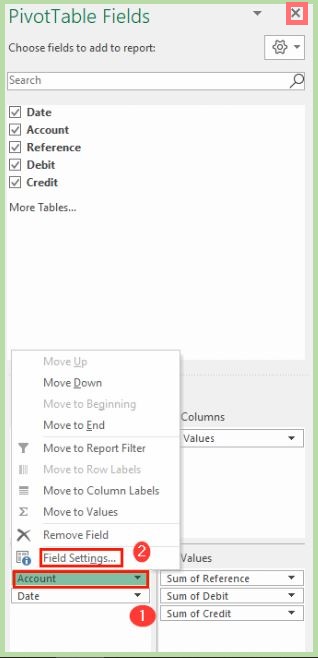
- Next, go to the PivotTable Fields dialog box.
- Now select the Account drop-down option.
- From there, Select Field Settings.
- Next, go to the PivotTable Fields dialog box.
- Now select the Account drop-down option.
- From there, Select Field Settings.
- This will result in opening up the Field Settings dialog box.
- Now, select the Layout & Print tab.
- Next, check on Repeats item labels and Insert blank line after each item label.
- Finally, click on OK.
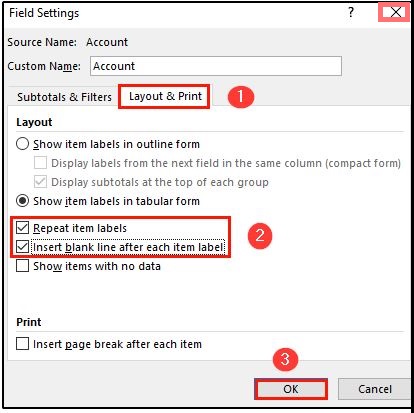
- This will repeat the item labels and insert a blank line after each item label like below:
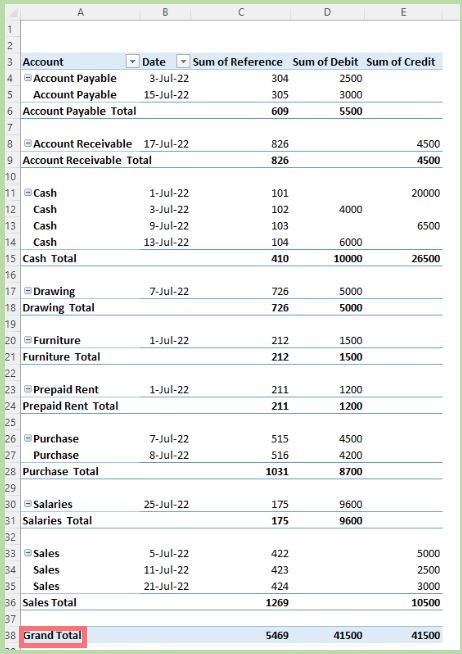
- Next, we want to change the format of the debit and credit columns.
- For this, go to the PivotTable Fields dialog box.
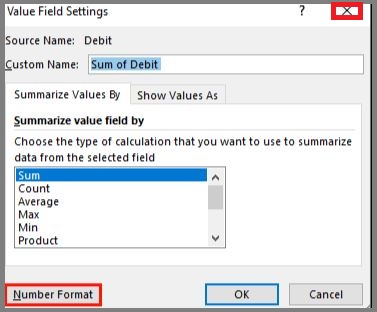
- Now select the Sum of Debit drop-down option.
- Next, select Value Field Settings option.

- This will open up the Value Field Settings dialog box.
- Now, select the Number Format.
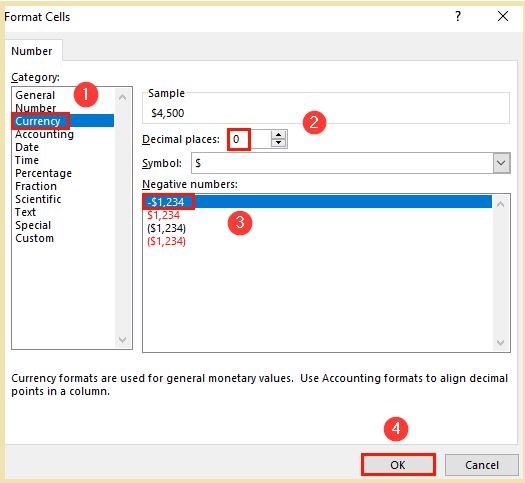
- This will cause the Format Cells dialog box will appear.
- Next, select Currency from the Category section.
- Now set the Decimal places as zero.
- Next, set your preferred negative numbers format.
- Finally, click on OK.
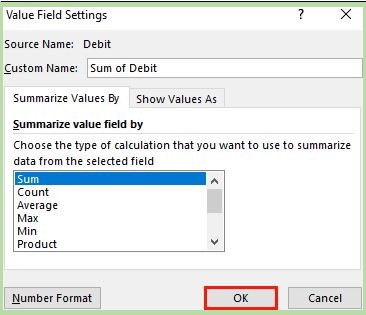
- Now, click on OK in the Value Field Settings dialog box to apply the changes.
- This will change the format of the debit column like below.
- Next, repeat the same procedures to change the number format of the credit column.
- Finally, you will get the following result like below.

Step 4: To Enable PivotTable Analyze Tab on Ribbon
- First, right-click on the ribbon.
- Next, select Customize the Ribbon.
- This will result in opening up the Excel options dialog box.
- Next, select Customize Ribbon.
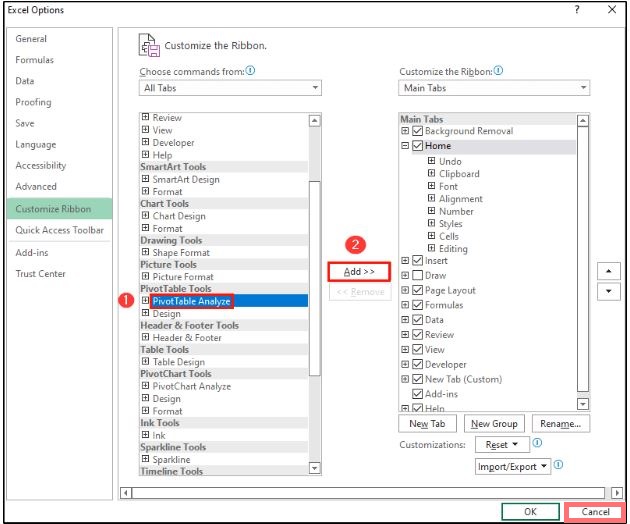
- Now, select All Tabs from the Choose commands from drop-down menu.
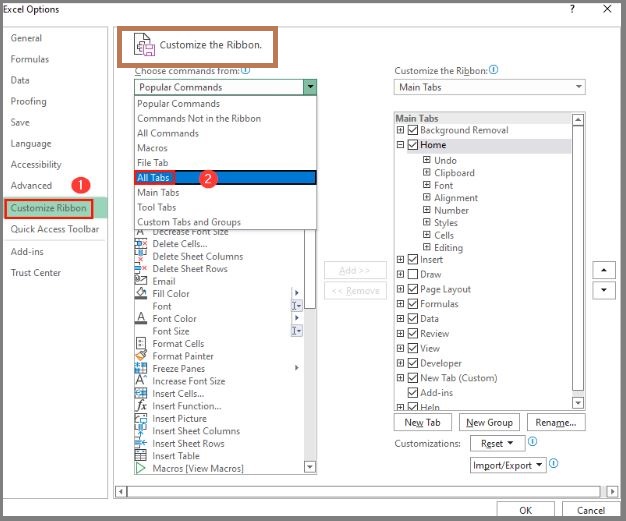
- Now, scroll down and select the PivotTable Analyze tab.
- Next, click on Add.
- click on OK to apply the change.
Step 5: To Create General Ledger
- Start by, select the pivot table.
- Next, go to the PivotTable Analyze tab on the ribbon.
- Now Select the Fields, Items & Sets drop-down option from the Calculations group.

- Now, select Insert Calculated Field after clicking on Calculated Field.
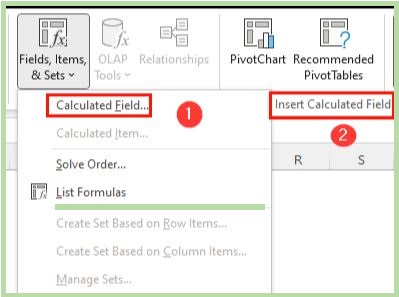
- This will open the Insert Calculated Field dialog box.
- Next set the name and formula.
- Now, click on Add.
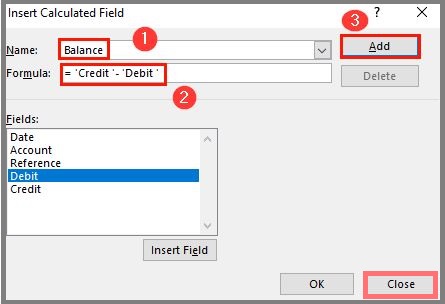
- click on OK to apply the change.
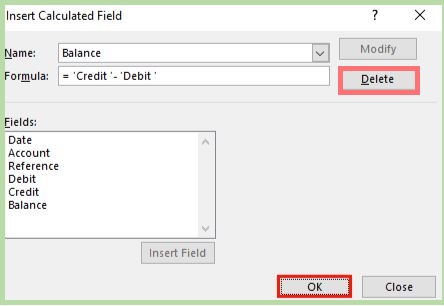
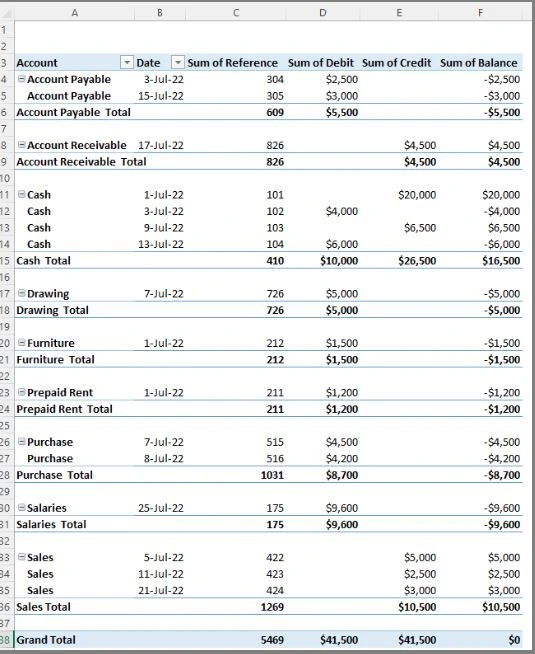
- This will create a new column using your given formula and name like below:
- Now, go to the PivotTable Analyze tab on the ribbon again.
- From the Filter group, select Insert Slicer.
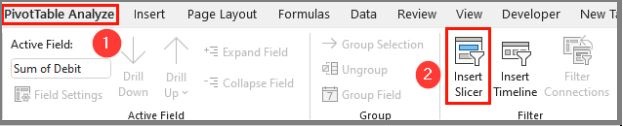
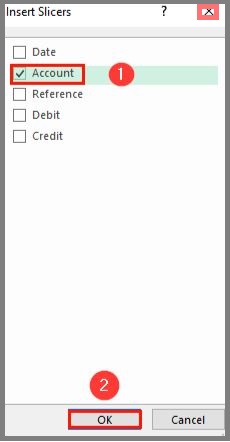
- Now, select Account in the Insert Slicers dialog box.
- Finally, click on OK.
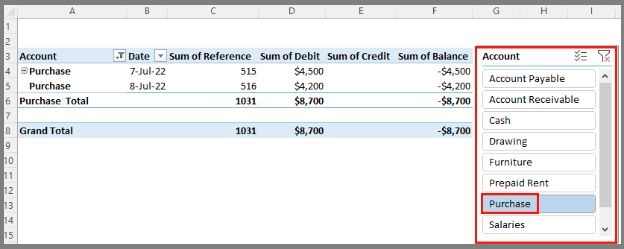
- This will create a specific sub-group where you can only view a certain group of transactions when you click on any item.
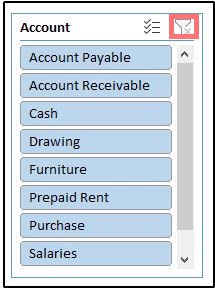
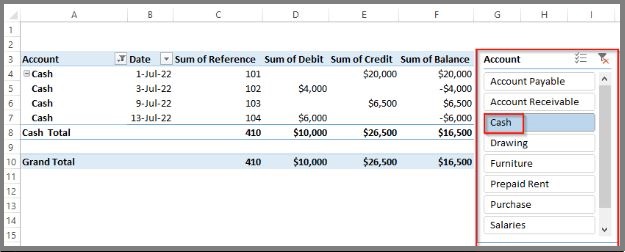
- Now, if we select cash in the slicer, then it will show the details of cash from the general journal data.
- Next, if you change the transaction from cash to purchase, you will get only the purchase transaction like below.
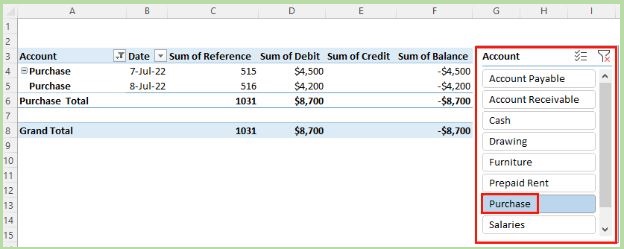
- Now, change the transaction from purchase to sales like below:
Also Read: How to Create a Journal Entries?
Conclusion!
So, you see, starting a business and ensuring its smooth run requires a great deal of accounting and the ‘right’ kind of knowledge that goes with it. Utilizing accounting specific software or rather the precise idea about it can create wonders for the growth of your organization. As mentioned earlier, there are various start-ups that are not equipped with the right resources to utilize a professional accounting service. In such cases, one can easily apply Microsoft Excel as a pretty good option. However, it is recommended that the business owner needs to have a sound knowledge and know-how about the functions, potential and the workings of the various accounting terms, techniques and understanding of the various tools of Excel inorder to get the required results. However, once your business has garnered enough momentum, you can surely upgrade to a professional accounting service.
Frequently Asked Questions
Can one use Excel as the General Ledger?
Yes, Excel has all the tools the techniques required to make it work like a General ledger. However, it is important that the user has all the required understanding and knowledge about making it work for you.
Is Excel an accounting tool?
Yes Excel can be used as an accounting tool.
 ChatGPT
 Perplxicity
 Claude
 Gemini
 Gork
Gork