How to Setup Linked Accounts in Sage 50
Updated On: September 18, 2025 5:07 am

In this blog, we would address one query we received from many of our regular readers and users of Sage 50. They wanted to know what linked accounts are and how to setup linked accounts in Sage 50. If you also want to know about it, we would request you to go through this blog till the very end.
User Navigation
Accounting Professionals & Specialized Experts
Want quick help from accounting software experts? Get in touch with our team members who can install, configure and configure your software for you. Proficient in fixing technical issues, they can help you quickly get back to work whenever you encounter an error in Sage software. Our team is available 24/7 365 days to assist you. To get in touch.
Here we go!
What are Linked Accounts in Sage 50?
When you execute a transaction in Sage 50 Accounting, linked accounts are used to automatically update all associated accounts. Thus, while performing a transaction, linked accounts shorten the time needed otherwise to allocate amounts to your accounts.
For instance, every time you make a sale, the number of inventory decreases and the amount your consumer owes you rises. Sage 50 records sales taxes, freight costs, and early-payment sales discounts into appropriate accounts with the help of linked accounts.
Please note the following points-
- If you have created the list of accounts yourself or you have imported your account list, you will need to set up the linked accounts for the related transactions.
- If you have opted for Sage 50 Accounting to create a list of accounts for you while setting up your company, you may already have linked accounts for certain transactions.
- For making any changes to or adding to your linked accounts, you can edit them one at a time. You can also add or edit several linked accounts at one go, with the help of the Linked Accounts Wizard
Also Read: Protect Employee Info in Sage 50
How to Setup Linked Accounts in Sage 50?
Here, we will discuss how to set up different types of linked accounts in Sage 50. Make sure to log into your system as a sysadmin and in single-user mode before executing the steps below:-
A) With the Help of the Linked Account Wizard
- Go to Setup
- Click on the Linked Account tab
- Click to use the Linked Accounts Setup Wizard
- Click Next
- Go through all the modules and follow the instructions to add, remove or change a linked account for any module in the system
B) Browse to the Linked Accounts Manually
- For Retained Earnings
- Go to Setup
- Click on Settings
- Tap on General (Accounts)
- Click on Linked Accounts
- Change Retained Earnings
- For Accounts Payable, Freight, Early Payment Discount and Prepayment
- Go to Setup
- Click on Settings
- Tap on Payables
- Go to Linked Accounts
- Change the accounts
- For Accounts Receivable, Revenue, Freight, Early Payment Discount and Deposit
- Go to Setup
- Click on Settings
- Tap on Receivables
- Go to Linked Accounts
- Change the accounts
- For Employee Payroll
- Go to Setup
- Click on Settings
- Tap on Payroll
- Go to Linked Accounts
- Click on the following modules and make changes accordingly
- Incomes
- Deductions
- Taxes
- User Defined Expenses
Also Read: How to Add Users in Sage?
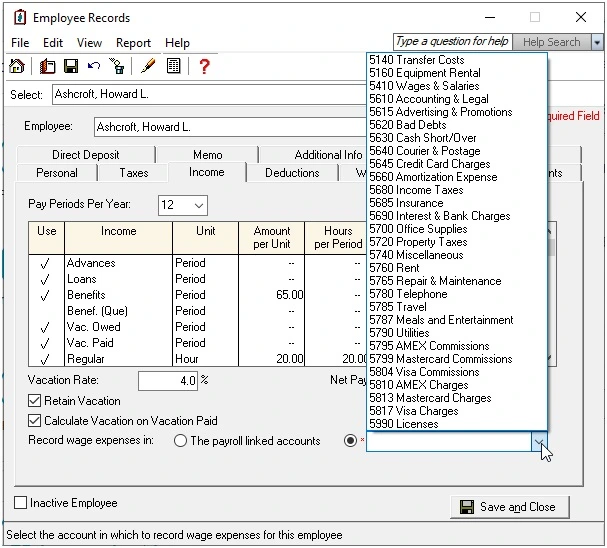
In case you are using Sage 50 Pro, you can designate a custom account to Record wage expenses. For this, you should go to the employee record and select the optional radio button as shown below:-
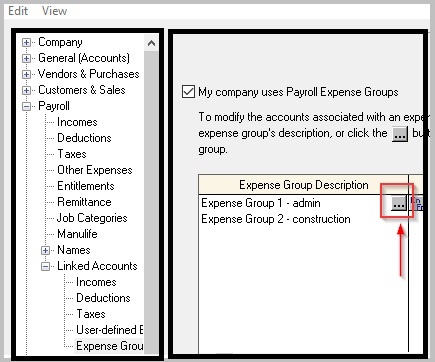
In case you are using Sage 50 Premium or Quantum, perform the following steps:-
- Go to Setup
- Go to the Settings section
- Tap on Payroll
- Go to Linked Accounts
- Click on Expense Groups
- Next, click on the dotted ellipses box
- Check the Linked Accounts column
- For Item Assembly Cost & Adjustment Write-off (inventory)
- Go to Setup
- Go to the Settings section
- Tap on Inventory & Services
- Go to Linked Accounts
- Change the accounts
- For Credit Cards
- Go to Setup
- Go to the Settings section
- Tap on Company
- Go to Credit Cards
- Click on both Used & Accepted
- Change the accounts
- For Sales Taxes
- Go to Setup
- Go to the Settings section
- Tap on Company
- Go to Sales Taxes
- Click on Taxes
- Change the accounts
- For Delivery Orders
- Go to Setup
- Go to the Settings section
- Tap on Company
- Go to Customers & Sales
- Go to Linked Accounts
- Click on Delivery Orders
Also Read: How to Set Up New Bank Account in Sage 50?
We hope the steps mentioned above would help you set up linked accounts in Sage 50. If you are experiencing any difficulties in carrying out the above-mentioned steps, we would recommend you to take help from some experienced Sage professionals 1800 964 3096.
Frequently Asked Questions:
How to Set up Linked Accounts in Sage 50 for Good Received Notes?
Please perform the following steps-
1. Go to Setup
2. Go to the Settings section
3. Tap on Company
4. Go to Vendors
4. Go to Linked Accounts
5. Click on Good Received Note
How to Make an Account Inactive in Sage 50?
Please follow the steps given below-
1. Open Sage 50.
2. Navigate to the Maintain menu.
3. Click on Chart of Accounts.
4. The window named Maintain Chart of Accounts will come up on your screen.
5. Enter/choose the account ID you wish to make inactive.
6. To view the list of existing accounts, browse to the G/L Account ID field.
7. Now type ?. Alternatively, you can click on the Lookup button as well.
8. Click the Inactive check box to the right of the selected Account ID.
How to Set up a Credit line Bank Account in Sage 50?
Here are the steps to follow-
1. Navigate to Chart of Accounts
2. Create a new bank account
3. Make sure to keep the Account Class as Bank.
4. Mark the Account as a Credit line account.
5. You may also select to make regular payments from this account
If you want to transfer money between this account and other bank accounts, follow the steps below-
6. Click on the Banking tab
7. Click the tab named Transfer funds.
8. You can click on the Transfer from /Transfer to bank name as you require.
9. Enter the amount as desired.
10. Click on Process.
Please Note: this asset account will most likely show a negative value.
 ChatGPT
 Perplxicity
 Claude
 Gemini
 Gork
Gork