Sage 50 US Data Using Sage 50 Database Repair Utility
Updated On: May 27, 2025 6:19 am

At times, when you’re running your Sage 50 software then you may encounter unexpected data technical or functional errors that leave you confusing and frustrated. Usually, this kind of error is related to damage or corrupt Sage data files and it can be encountered due to innumerable reasons such as improper connection between your network and data path, etc. Such corrupt data files can be resolved using Sage 50 Database Repair Utility.
User Navigation
Accounting Professionals & Specialized Experts
Want quick help from accounting software experts? Get in touch with our team members who can install, configure and configure your software for you. Proficient in fixing technical issues, they can help you quickly get back to work whenever you encounter an error in Sage software. Our team is available 24/7 365 days to assist you. To get in touch.
So, if you’re not aware of the process to run this tool then it is suggested you read this blog till the end and also get a complete resolution for how to repair Sage 50 data using Sage 50 Database Repair Utility.


Sage 50 Database Repair Utility Download With Steps
The latest and most up-to-date version of the Database Repair Utility can be downloaded by following the below-mentioned steps:
- Go to Start and then click on All Programs.
- Select Sage 50 Accounting [year].
- Now select Sage 50 Resources and Help and go to Technical Support Utilities.
- Finally click on Sage 50 Database Repair Utility to start the tool.
Corrupt Data Files Can Be Resolved Using Sage 50 Database Repair Utility
Troubleshooting a Corrupt Data Files issue using an essential steps:
How to Use Sage 50 Database Repair Utility?


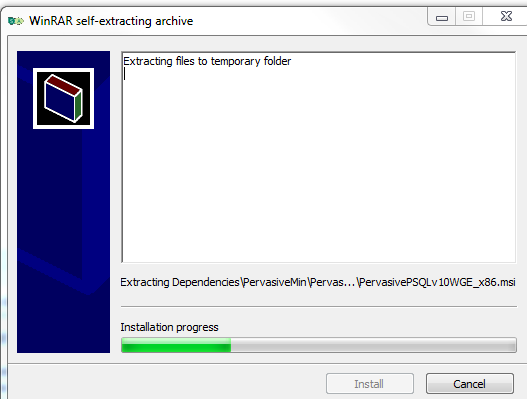
- When you start the tool, all files necessary for the functioning of your tool will be automatically extracted.
- Click Install to begin the process.
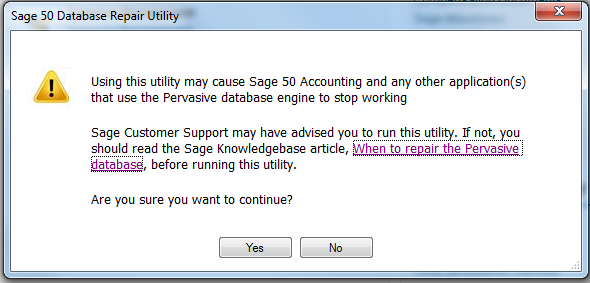
- In the message box, click Yes to continue or click on the link to view the Sage Knowledge base article for more information about this tool.
- Read the End User License Agreement and click Agree to start using the tool.
- Select from the three available options and click on Run to successfully run the utility and read the results in the Result Log text box:
- Remove Pervasive: This utility will uninstall Pervasive from your local computer. Before using this utility, make sure that all users have logged out and closed Sage 50.
- Install Pervasive: This utility will install Pervasive to your local computer and will automatically patch all necessary updates. Again, make sure that all users have logged out and closed Sage 50 before using this utility.
- Create New Local Data path: This utility generates a new Sage 50 data path directory with default files to troubleshoot issues with the existing data path. This provides a new set of files for Sage 50 to work with. Here’s how to create a new local data path:
- Select the location for a new data path. It should be different from the previous location.
- Company to Copy feature will move the entire directory from the previous data path to the newly created data path. This might take a long time since your entire directory will be copied to a new location.
- If you wish to revert to the initial data path, click Manage INI Files and select the original data path and select Make Active to apply the changes.
- Click OK once you have finished the process.
Since Creating a New Local Data path is an advanced option, it is always advised to use Sage 50 Database Repair Utility under expert guidance.
Though Sage 50 Database Repair Utility will not affect your company’s data files, improper use of the tool can render your Sage 50 inoperable.
Also Read: Download Sage 50 2024
Sage 50 US Data Using Sage 50 Database Repair Utility
Here is a step-by-step solution on how to use the Sage 50 US data using Sage 50 Database Repair Utility. The Sage 50 Database Repair Utility offers users the ability to quickly determine whether or not a problem that a customer is experiencing is caused by any of the following:
- A damaged or wrongly patched instance of the Pervasive Database Engine
- Missing, damaged, and outdated files located in the data path
- Problems related to the data path across the network
Starting with R2020, the Pervasive component has been renamed to Actian Zen. In R2020 and higher versions of the Database Repair Utility (DBRU), the Install and Remove options refer to Actian Zen; the instructions below are still valid for Actian Zen. Treat “Pervasive” and “Actian Zen” or just “Actian ” as synonyms. Start the Tool
- Once the tool is started, all of the files required for the tool to function will be extracted.
- Within the following message, the user can select the link to view a Sage Knowledgebase article if you wish to find out more about this tool.
- Next, read the End User License Agreement and click on ‘Agree’ if you agree to all terms and conditions to start using the tool.
- Here, you will be offered three available options within the tool:
- Remove Actian, see Section 1 below.
- Install Actian, see Section 2 below.
- Create a New Local Data path, see Section 3 below.
Section 1: To Remove Actian
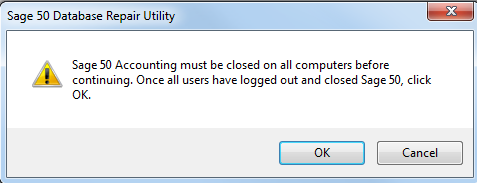
The Remove Actian Zen utility is used for uninstalling Pervasive from the local system. This utility is generally used in conjunction with the Install Actian Zen utility. It is also necessary to make sure that all the users have logged out and closed Sage 50 before using this utility. On starting this utility; a message will appear with a reminder.
Note: The initial attempt to uninstall Actian will usually fail. This is right and is mainly caused due to the Actian being started during the uninstallation process. In this case, simply run the process once again to successfully uninstall Actian.
Section 2: To Install Actian
The Install Actian utility will install the Pervasive over to the local computer and automatically patch it with the required updates. This utility is mainly used in conjunction with the Remove Actian Zen utility. It is necessary to make sure that all the users have logged out and closed Sage 50 before using this utility – upon starting this utility; a message will provide a reminder.
Note: In case the installation process fails more than twice, there is a high probability that there is a registry-related problem and you are getting Error 1402 – follow Error: “1402. Could not open the key: UNKNOWN\CLSID\…..”. The tool will suppress this error.
Section 3: To Create a New Local Data Path
The Create New Local Data path utility works by generating a new Sage 50 data path directory with factory-default files. This offers a clean set of files for Sage 50 to function with troubleshooting problems within the existing data path. You can also copy a Sage 50 company into the new data path directory to test an existing company within the new data path.
Note: The Create New Local Data path utility is an advanced option, hence it is recommended that you only use it under the guidance of Sage 50 Customer Support.
- Start by verifying the location of the new data path, It should be within a location that previously did not exist on the computer.
- The company to Copy feature will move the complete directory from the previous data path to the newly created data path. If the copy feature fails, then this is because of the SmartPosting and/or Pervasive running on the computer. In this case, you might need to manually stop these services by going to Services. msc.
Note: When you are copying a company onto the new data path, it will copy the complete directory, including backups, attachments, and others. This process could take a long time according to the size of the directory and the speed of the computers/network doing the file transfer.
- Manage INI Files allows you to revert to the initial data path. Here, you need to select the original data path and select Make Active. Once done, close out of the Database Repair Tool.
- When the newly created data path is working and you want to use it permanently moving forward, you will also need to complete the following steps to ensure future updates will function correctly:
- Go to the following registry key (replace with 28 for 2021, 27 for 2020, etc.)
- 64-bit machine – HKEY_LOCAL_MACHINE\SOFTWARE\Wow6432Node\Peachtree\Version\ \Online Update.
- 32-bit machine – HKEY_LOCAL_MACHINE\SOFTWARE\Peachtree\Version\ \Online Update.
- Update the String Values for “Path” and “UpdatePath” to match the new data path that you have chosen above.
- Now, reinstall the latest Sage 50 Service Release.
Final Words
All Sage error has multiple solutions to rectify them. Likewise, this error has various possible solutions that are suggested by Sage Experts. However, this damaged data file can easily resolve just by transferring your data to any other drive. Above are all the suitable solutions that can help you to troubleshoot how to repair Sage 50 data using Sage 50 Database Repair Utility successfully. So, carefully apply all the solutions that are discussed above.
Frequently Asked Questions:
How can I locate my Data Path and Program Path Inside Sage 50 U.S. Edition?
It is pretty easy to locate the data path and program path inside Sage 50 software and its Properties icon. Just follow the below-provided steps:
1. Initially, launch Sage 50- U.S. Edition
2. Next, go to the File section >> Open Company
: Remember that you don’t have to pick the option called Open Previous Company”
3. Now, drag your box at the corner of your screen that gives a clear view of the entire directory
4. The directory you see is the data path, minus the truncated spelling of the name of the company
5. In order to locate the data path:
6. Perform a right-click on the Sage shortcut icon
7. And then select Properties
8. Here, you will see a blue highlighted path on your target lines, minus Peachw.exe, is the Program path.
Note: If you select the option “Open File Location” then the program path will open for you.
How do I change the Data Path at the Sage 50 Server or Standalone Computer?
Using these steps, you can easily change the data path at your server computer:
1. First, open your Sage 50-U.S. Edition and then create a backup of each and every company file
2. Next, you need to close the Sage 50 application
3. Now, open Control Panel then go to the “Programs and Features” section
4. Here, you have to click Uninstall Sage to uninstall it
5. Again, you have to reinstall the Sage 50 software by selecting a new data location
6. At last, launch Sage and perform the Restore process for each backup from step 1 into your new company file.
How do I Change the Data Path at my Workstations Computer?
1. The very first, close your Sage.
2. Make a note the path to the new data location.
3. Now, open your computer.
2018 & Earlier:
Browse to the location: C:\Program Files\Common Files\Peach or C:\Program Files (x86)\Common Files\Peach
2019 & Earlier:
Browse to the location: C:\ProgramData\Sage\Peachtree
Open your configuration file for your version (if it asked you to select the program the use Notepad)
1. Release 2021: Peachtree280.ini
2. Release 2020: Peachtree270.ini
3. Release 2019: Peachtree260.ini
4. Release 2018: Peachtree250.ini
5. Release 2017: Peachtree240.ini
Here, you have to edit the line starting with DATAPATH= to use your new data
6. Go to the File menu and click Save.
7. After that, close your Notepad.
8. Finally, open your Sage and check whether you’re able to access your data or not.
