How to Run Sage 50 Data Integrity Check?
Updated On: May 19, 2026 12:00 pm

Sage 50 Data Integrity Checks are internal auditing routines that are used to verify the posted transactions to make sure that the individual components of every transaction are in balance-in essence. This is irrespective of whether the parts equal the whole or vice versa. However, bear in mind that the Data Integrity Checks are not meant to modify data. Nor will the Sage 50 Data Integrity Check locate incorrect entries that have been made. These include aspects such as human error but will diagnose situations where actual data has been corrupted because of some hardware failure.
User Navigation
Accounting Professionals & Specialized Experts
Want quick help from accounting software experts? Get in touch with our team members who can install, configure and configure your software for you. Proficient in fixing technical issues, they can help you quickly get back to work whenever you encounter an error in Sage software. Our team is available 24/7 365 days to assist you. To get in touch.
It is also advised that you run the checks at least once per week or anytime you discover that an event might have resulted in damage to your database. Examples of such cases could be a server crash, power failure during posting, or a “blue screen” error that usually causes your workstation to “freeze.” Whenever the software has unexpectedly interrupted to provide the completion of a task, it is recommended to run the Sage 50 Data Integrity Checks. You should also run the Data Integrity Checks in case you experience an out-of-balance situation in reporting. For example, the A/P detail ledger balance does not tallies with your A/P Trial Balance figure.
Read More: How to Run Sage 50 Data Verification?
Steps to Run Sage 50 Data Integrity Check?
The Sage 50 Integrity Check is essentially a tool that allows you to verify if any of your data files are corrupted and to be able to repair them if possible.
Before you run any integrity check test, you need to complete the Data Verification processes. Data Verification is a Sage 50 utility that determines if any data files are missing or possibly damaged. Typically minor errors can be repaired for you immediately.
If it has been determined by the Sage 50 Customer Support Analyst that the data needs to be repaired, you can run the Sage 50 Data Integrity/Repair utility. For this, follow the below steps:
- Go to Help.
- Next, go to Customer Support and Service.
- Now click on Integrity Check.
- Click Backup to create a backup of your company data and then proceed to the Integrity Check utility.
Note: You must back up your company before you use Integrity Check; if the Integrity Check procedure is not successful, you may lose valuable data. After you create a backup of your company, the Sage 50 Data Integrity Check/Repair window will appear.
- Next, click select the type of test you need.
- To perform, you need to make sure that you Perform only one test at a time. Do not go for multiple. tests at the same time. This can make the problem more difficult to rectify.
Following are the types of tests that you can perform:
- File Tests
- Data Synchronization Tests
- Invoice/Payment Synchronization.
- Click OK to continue.
File Tests
- Change Accounting Periods
- Setup Test
- Data Consistency
- Reindex Files
- Journal Balances
- G/L Balances
Data Synchronization Tests
These are the test types that compare the contents of permanent data files with journal transactions that have been posted to them. Once a difference has been discovered, the permanent data file is rectified to match its journal entries.
The Data Synchronization tests comprise of the following:
- Customer/Journal
- Employee/Journal
- Chart of Accounts/Journal
- Vendor/Journal
- Inventory/Journal
Invoice/Payment Synchronization Tests
The Invoice/Payment Synchronization tests that are used in Integrity Check comprise the following:
- Accounts Receivable
- Accounts Payable
Also Read: How to Setup New Company in Sage 50?
Accounts Receivable and Accounts Payable Invoice/Payment synchronization Tests
This examines the payment transactions that are applied to invoices to check if they match the amount that the invoice records to have been paid.
The users are offered three options for running this test:
- Invoice has been presumed correct: This assumes that the amounts paid on all invoices are correct and that the additional payments made are not to be linked with the invoice.
- Payments are assumed correct: This assumes that the payment transactions that have been applied to the invoice are correct where a synchronization error has been found and that the invoice amount paid total requires to change to reflect this amount.
- Ask each time: This allows the user to determine if the invoice or payments are correct one error at a time. This is the main recommended option for running Accounts Receivable and Accounts Payable in Sage 50 tests. However, It’s not available for electronic payments.
Steps When Repairing an Inappropriately Changed GL Account Type in Sage 50
Following are the steps to repair an inappropriately Changed GL Account type:
Step 1: Start by Printing the samples of the incorrect reports.
Step 2: Next Backup your Sage 50 company data files.
Step 3: Now, the Change to fiscal period 1 (FP1) offers the special properties to utility we will run to change things in previous periods.
Step 4: Go to Help-Support Utilities->Integrity Check.
Step 5: In the Data Synchronization Section, you need to run the Chart of Accounts / Journal test.
The user needs to bear in mind that if multiple accounts have issues then, this test might need to be run multiple times. This will cause the pop-up to say that a footing error was corrected in such such account in period whatever. Keep running the test until no message is displayed.
However, Before you run the Synchronization tests, re-indexing the tables that are being corrected is often recommended. In this case, the files would be; Chart; Jrnl Header & Jrnl Rows. Re-indexing should always be done on File at a time.
Step 6: Reprint the same list of reports created in Step 1
Step 7: Next, audit the results against the before reports printed.
If the problems are not fixed or get even worse, you need to restore them immediately before doing anything else.
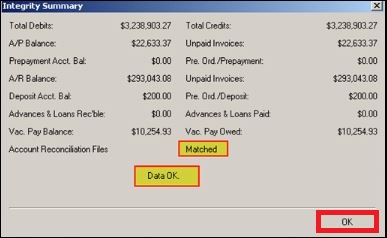
Once the audit of Sage 50 has been completed the confirmation of the data has been corrected and your issue and the gl trial balance are in the right balance you are good to go. This means that the debits and credits at the end of the current period Sage 50 general ledger trial balance are the same balance.
Step 8: Be sure to create a backup if you have reviewed the reports in detail they are error-free and you are not receiving any errors in Sage 50 when recording transactions.
Step 9: Now change the account type for the affected gl account(s) back to their original settings and run the chart/journal sync test again in FP1 until no messages are displayed. Confirm that the GL trial balance is in balance for all open periods and that the ending balance for retained earnings in the last closed period is modified by the net earnings for that year that matches the beginning balance in the first open period within the general ledger report.
Step 10: Now you need to Set up a new account with the correct account type. Either edit all transactions in all open periods to the new account or make a journal entry to move the entire balance of the wrong account to the new one at the end of each open year. It should have a zero balance at the end of each open accounting year. Next, set the wrong account to inactive. You can also rename the ID for the old/bad account and then rename the ID for the new account to be the same as the old one using the change button.
Also Read: How to Troubleshoot Sage 50 Account Out of Balance Error?
Final Words
The Sage 50 Data Integrity Checks usually take time to process. It is advised that the first time you run integrity checks you do so at a time when you can afford to be out of the software for some time. You will also need to benchmark how long the integrity checks can take to process for your organization. The kind of time required for the checks to be completed will differ based on the hardware configuration and the size of the database being checked.
Frequently Asked Questions:
What is meant by Data Verification in Sage?
Data Verification is a Sage 50 utility that allows you to verify if any of your data files have gone missing or possibly damaged. Be sure to contact Customer Support before you use the Sage 50 Data Verification utility. This way a support analyst will instruct you on which test(s) to run.
What is meant by Integrity Check?
An integrity background check is the process of verification of the integrity of an individual or organization. This information is then utilized to determine whether an individual is likely to be dishonest or otherwise pose a risk to the company.
What is the main Function of the Integrity Checks?
Integrity checkers create a baseline first by converting the clean files into numbers or hash functions and then saving them in their memory. Each time an integrity check is performed, the checker compares the hash functions and checksums of the files against the baseline data.
 ChatGPT
 Perplxicity
 Claude
 Gemini
 Gork
Gork