Fix Sage 50 Error Not Enough Memory to Continue
Updated On: March 6, 2025 12:26 pm

Do you get the error on your screen “Not Enough Memory to Continue” while using Sage 50? One of the most common errors when using Sage. This problem can be caused by a number of factors such as insufficient RAM or disk space, corrupted system files, or conflicts with other software installed on the computer. When the “Sage 50 Not Enough Memory to Continue” error message appears, the user may not be able to complete the task they were trying to perform. but often it is due to insufficient disk space. In order to fix this issue you will need to free up space on your computer.
User Navigation
- Accounting Professionals & Specialized Experts
- What is Sage 50 Error Not Enough Memory to Continue?
- How to Fix Sage 50 Error Not Enough Memory to Continue?
- Sage 50 Not Enough Memory for Printing or Invalid Printer Setup Error
- Causes of the Sage 50 Not Enough Memory for Printing or Invalid Printer Setup Error
- Steps to Fix Sage 50 Not Enough Memory for Printing or Invalid Printer Setup
- Conclusion!
- Frequently Asked Questions:
- Can I compress the Data Files and reindex them so that the error “Not Enough Memory to Continue” got resolved?
- What is the Minimum requirement for the Free Disk Space in Sage 50?
- Is there any other way to Fix the Sage 50 Error not enough Memory to continue?
- How can I reset the default Printer?
- What is the procedure to Clear the Print Pool?
Accounting Professionals & Specialized Experts
Want quick help from accounting software experts? Get in touch with our team members who can install, configure and configure your software for you. Proficient in fixing technical issues, they can help you quickly get back to work whenever you encounter an error in Sage software. Our team is available 24/7 365 days to assist you. To get in touch.
What is Sage 50 Error Not Enough Memory to Continue?
The name of this Sage 50 error suggests it all. This error appears when Sage is not able to find enough free space on the hard disk to store data and process it. This can happen for a variety of reasons like.

- You may be running low on disk space
- Your disk might be corrupt
- The disk may have the Quota settings on it.
- Corrupt system files.
- BDE settings
Also Read: How to Print Sage 50 W2 Forms?
How to Fix Sage 50 Error Not Enough Memory to Continue?
According to the Sage 50 out of memory problem that you are facing, the solutions differ. All the possible solutions for this error have been provided below:-
Adjust windows for best performance
- Right-click on My Computer.
- Click on properties and Select System Protection.
- Click on the Advanced tab and the Setting button in the Performance section.
- Select Adjust for best performance checkbox.
- Click on the Apply and Ok button. Refer to the screenshot below.
Low Disk Space
There is not much you can do when running low on Disk Space. You may have to buy or upgrade your disk space or delete some of your data. You can also try disk defragmentation to free up some extra space on your disk.
To do this, Follow the Steps given below:-
- Open Windows Explorer
- Right Click on the disk that you want to work with
- Click on properties
- Select the Tools tab
- Click on Optimize nest to Disk Defragmentation
- A new window of Disk Defragmentation will appear.
- Click on Analyze and windows will inform you at most how much space can be freed.
- Click on optimize to free space on your disk.
- The fragmented parts of files will be rearranged to free up some space on the disk.
Quota Settings
In settings, you can reserve the amount of data a particular user can store on a disk drive. This makes sure that one particular user does not take all the space in the drive. You can check your Quota settings to find out whether you have disk space that your user account cannot access.
To do this, Follow the Steps given below:-
- Open Windows Explorer.
- Right Click on the drive you want to work with.
- Select Properties.
- Go to Quota tab.
- Click on Check Quota Settings.
- Uncheck the option “Enable quota management”.
- Click Apply and ok twice.
Note: This will make sure that any user can access all the disk space on this particular drive.
Corrupt System Files
There is a chance that some window file may have got damaged due to some malicious software. This may be causing this particular error in Sage 50. You can restore or repair your windows to fix this problem.
To Repair Windows System Files, Follow the Steps Given Below:-
- Create a disk or bootable USB with the windows installation files in it.
- Run the windows installer.
- Click on repair windows.
- Windows will automatically start repairing the system files. This can take some time and so you need to have patience. If this method does not work then you might need to restore your windows.
To Restore windows, Follow the Steps given below:-
- Goto PC settings.
- Click Update and Recovery.
- Select Recovery.
- Now hit Remove everything and reinstall windows.
- Click on Get Started and follow the instructions provided in the wizard.
This will delete all the data on windows, so make sure to create a backup of your files. For older versions of window you might have to perform a fresh installation.
BDE Settings
Sage out of memory error also occurs because the BDE settings have not been optimized. Sage uses the Borland Database System (BDE) and that is why the settings need to be optimized.
Follow the Steps Given Below to Optimize BDE Settings:-
- Login into an Administrator user account.
- Open Run from Start Menu.
- Type ‘regidit’ and hit run.
- Expand the HKEY_LOCAL_MACHINE.
- Under the branches expand software and under it Right Click on Borland.
- Select Permissions.
- In the Permission for Borland window click on Users and allow full control.
- Hit apply and ok.
This will enable the BDE settings for all users in Windows 7 and above. You can follow the above methods to resolve this particular error and use Sage 50 swiftly and easily.
Corrupt Disk
Sometimes your disk is damaged due to virus or any other malicious software. There is an easy fix to this problem.
To Fix the Damaged Disk, Follow the Steps Given Below:-
- Open Windows Explorer.
- Right Click on the disk you want to fix.
- Select Properties.
- Go to the Tools tab.
- Click check under Error checking.
Note: This tool will check for any error and then try to fix it. You may also try restoring the drive to a previous version. For this you need to have a previously created backup of the drive.
To Restore a Backup in Sage 50, Follow the Steps Given Below:-
- Open Windows Explorer
- Right click on the drive you want to restore to a previous version
- Select Properties
- Go to the Previous version tab
- Click on Restore and browse to the directory of the backup file.
Now windows will automatically restore the drive to a previous version. You can also create and restore backup by using third party software.
Sage 50 Not Enough Memory for Printing or Invalid Printer Setup Error
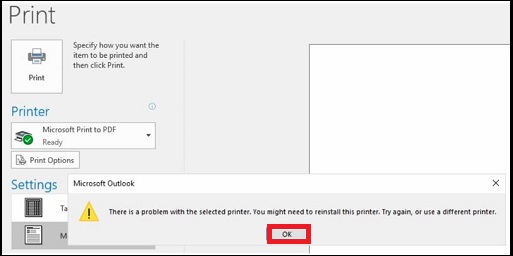
Many of our regular readers have intimated to us that they have been facing certain issues related to printers while trying to print from within the Sage 50 application. Of all the error messages reported, the Sage 50 error message not enough memory for printing or invalid printer setup error is the most common.
Causes of the Sage 50 Not Enough Memory for Printing or Invalid Printer Setup Error
Many technical and operational issues in your system could be causing this issue. Some of these are-
- Insufficient user rights
- Printer not available
- Windows error.
Steps to Fix Sage 50 Not Enough Memory for Printing or Invalid Printer Setup
Here we are providing multiple methods to resolve this common issue-
Step 1: If the issue is caused because of Insufficient user rights
Before proceeding with the steps to troubleshoot, please log in to your computer as an admin. Then, follow the steps below-
- On your desktop, do a right-click on the Sage 50 icon
- Click on Run as administrator
- The prompt for the User Account Control (UAC) will be displayed on your screen.
- Agree to it
- The program will run now
- Now try to print and check if the issue is appearing again
Step 2: If the issue is Caused due to Windows Errors

If there is any issue with your Windows operating system, you may experience this error message. To troubleshoot, carry out the steps below-
- Verify if the sample company is also giving the same error
- Change the printer setup to either a PDF or XPS document writer and check if you are still getting the same error message
- Now navigate to Control Panel
- Then go to Administrative Tools
- Click the Event Viewer
- Choose the Windows Logs
- Click on Application,
- Choose Filter Current Log
- Keep a check for Errors,
- Click OK to proceed
- If you notice a WMI or .Net Framework error, consult with your IT expert
Step 3: If the issue is caused due to an Incorrect Printer Selected or the Printer not available at all

It may happen that you have not selected the correct printer or your selected printer is not available to print at the moment. Therefore, you need to make sure that you are sending the print command to the right printer. To ensure this, follow the sequential steps shown below-
- Navigate to Setup
- Go to the Reports & Forms section
- From the list appearing on the left, choose the section you want to print (Packing Slips, invoices or Cheques)
- Verify if the selected printer is available. If multiple entries exist for a selected printer, test to figure out the correct entry
- Check if you are able to print successfully now
Step 4: Check if the Print Spooler Service is Functioning Properly
- Go to Control Panel
- Click on Administrative tools
- Now click on Services
- Next, you need to right-click on the Print Spooler service
- Click on Start.
- Check if the service is started already. If so, click on Restart
- Check if you are able to print successfully now
Also Read: Fix Sage I/O Error in the File Directory
Conclusion!
In short, you have to identify the reason and then find the solution accordingly to apply it. This helps you to fix the Sage 50 Error “Not Enough Memory to Continue”. If you are facing issues, and have more queries then reach out to the helpdesk. The Sage 50 helpdesk team is here to assist you.
Frequently Asked Questions:
Can I compress the Data Files and reindex them so that the error “Not Enough Memory to Continue” got resolved?
Yes, you can re-index and compress the data files in your Sage 50 account. The steps are as follows:-
To Re-index the Data:
1. Take a backup before doing the process
2. In Sage 50 software, click on the Help menu option
3. Click on About from further options
4. In the Data information, check and note down the number of splits
5. Go to the File menu option
6. Select the Maintenance option
7. From further options, click on the option Re index
8. Choose the files that are relevant
9. Then click the OK button and then click the Yes button
To Compress the Data:
After re indexing, it asks you to do the compressed data routine for claiming the space of the disk. So the steps to compress data are:-
1. After re indexing, you are asked for compressing data
2. Then click on Compress Now button
3. Now, remove the tick mark from the check box named Compress All Data Files
4. After that, click on the button Compress then click on the OK button
5. Click on the Close option and then click the Close
6. Again, go to the Help menu
7. Click on the About
8. Then in the Data Information, check that the number or splits do match with step d in re index the data.
What is the Minimum requirement for the Free Disk Space in Sage 50?
A minimum free disk space of 5 GB is required. So do check that you must have to fulfill the minimum requirements to avoid the Sage 50 error “Not Enough Memory to Continue”.
Is there any other way to Fix the Sage 50 Error not enough Memory to continue?
Yes, here are the steps to fix it in another way:-
1. Firstly, reboot your computer
2. If still error happens check for system requirements that must be fulfilled
3. In Sage 50 go to the File menu
4. Then click on Maintenance
5. After that, select Check Data option
6. Now, you have to re index and compress the data files to fix the error
7. In the end, you are done.
How can I reset the default Printer?
Here are the steps to follow-
1. Make an exit from the Sage 50 application
2. On your keyboard, press the Start key
3. Next, go to the Devices and Printer section
4. Search for an alternate printer
5. Do a right click on it
6. Choose ‘Set as default printer’
7. Now, select the printer you set previously as the default printer
8. Right click on it and select ‘Set as default printer’
9. Next, close down the Devices and Printer screen
10. Log in to Sage Fixed Assets
11. Go to the File section now
12. Click on the Print Setup tab
13. Next, click on the alternate printer
14. To proceed, click OK
15. Run the report program again
What is the procedure to Clear the Print Pool?
Please follow the steps below-
1. On your keyboard, press the Ctrl and R keys simultaneously
2. The Run window will open up
3. In the text box, type services.MSC.
4. Press Enter
5. A list of running services will pop up on the screen.
6. Locate the print spool service
7. Do a right-click on it and choose the Stop option
