Fix Sage 50 Error Failed to Switch Terminal Server to Install Mode
Updated On: August 8, 2025 9:16 am

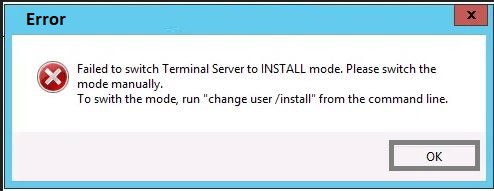
While trying to install Sage software through Remote Desktop Connection, you might encounter an error leaving an error message “Failed to switch Terminal Server to INSTALL mode”. To fix the for Sage 50 Error Failed to Switch Terminal Server to Install Mode, firstly switch the mode, and from the command line, select “change user install”.
User Navigation
Accounting Professionals & Specialized Experts
Want quick help from accounting software experts? Get in touch with our team members who can install, configure and configure your software for you. Proficient in fixing technical issues, they can help you quickly get back to work whenever you encounter an error in Sage software. Our team is available 24/7 365 days to assist you. To get in touch.
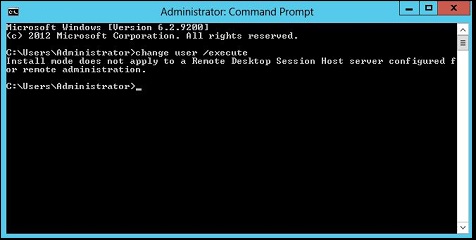
Mostly when a new update is there, this error might crop up. Therefore manually try to open up Prompt Command and enter the “change install/user”. However, sometimes the “Install mode does not work to a Remote administration or configured Remote Desktop Session Host server“.
Also Read: Fix Sage 50 Error Printer Not Activated Error Code 30
When Does the ‘Sage 50 Error Failed to Switch Terminal Server to Install Mode’ occur?
The ‘Sage 50 Error Failed to Switch Terminal Server to Install Mode’ issue mainly occurs when a user tries to install the Sage software through Remote Desktop Connection. This error message often pops up when a new update is installed. To fix the issue, you should switch the mode and then from the command line, choose “change user install”. We will discuss this in detail in the sections below.
Causes of Sage 50 Error Failed to Switch Terminal Server to Install Mode
- Windows Remote Desktop Didn’t identify Autorun function.
- Unrecognized Autorun function by Windows Terminal Services.
Resolutions to Fix Sage 50 Error Failed to Switch Terminal Server to Install Mode
Here, we are presenting multiple methods to resolve this issue-
Solution 1: Installing from the Download Link
- Open My Computer or Computer.
- Browse to Sage software folder, and then double-click Sage 50 software folder.
- Double-click on the peachw folder.
- Double-click to the install folder.
- Right-click on the setup.exe, and then choose Run as administrator.
Solution 2: Install Using the Install Files in the Temp Folder
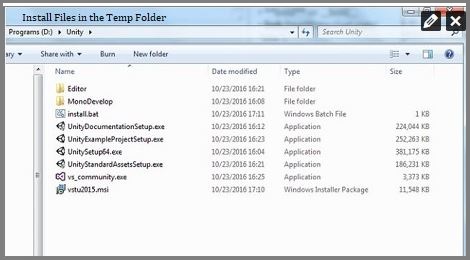
- Press and hold Windows+ R keys on your keyboard
- Enter %temp% on the search box, and click OK.
- Double-click on the the RarSFX folder or RarSFX0 folder.
- Double-click on the peachw folder.
- Double-click on the install folder.
- Right-click on the setup.exe and then choose Run as administrator.
Solution 3: Install by Using the Install Files in the Program Path
Note: This folder is only accessible if you are done with network install while installing initially on the server.
Browse to the software Path. Find out the instruction, to find the program path and data path in the resources section.
- Start the folder PeactreeInstaller20XX in the Program Path.
- Double-click on the peachw folder
- Double-click on the install folder
- Right-click to the setup.exe, and then choose Run as administrator
Solution 4: Download an Updated Copy of Sage 50 20XX
- Download latest version of Sage 50 20XX by using the link in the section ‘Additional Information’
- By defaulting the install files extracts to C:\Sage\Sage50_20XX_X Browse to C:\ Sage50_20XX_X/Sage\install/peachw\ or to extracted location.
- Right Click to the setup.exe and select Run as administrator.
Solution 5: Discover the _setup.exe in the Temporary Directory
- Ensure that you have attempted to run at least once the “SETUP.EXE” file; hence all of the files get opened in the temporary directory.
- Go to Start key button on your keyboard, and click Run to RUN the application.
- Simply enter %temp%, once the run application starts.
- Press enter to temporary directory folders.
- Open the Peachw folder and run the _setup.exe as the administrator.
Also Read: Sage Install Error 1308 Source File Not Found Error
Final Words
We hope the troubleshooting steps mentioned above would help you fix the Sage 50 Error Failed to Switch Terminal Server to Install Mode’ issue on your system. If you are finding it tough to perform the steps shown above or are unable to fix this issue, we would request you to speak to some authorized Sage professionals.
Frequently Asked Questions:
How Can I find the Sage Data Path from Sage and its Icon properties?
Please perform the steps below to find the Data path from Sage and its Icon properties :-
1. Open the Sage 50 U.S. Edition software
2. Select File
3. Click on Open Company.
Please Note: Do not click on Open Previous Company
4. Now drag the corner of the box so that the full directory is shown.
5. If you minus the truncated spelling of the company name from the name of the directory, you will obtain the data path.
How can I find the Sage Program Path from Sage and its Icon properties?
Please perform the steps below:-
1. Right-click on the Sage shortcut icon on your desktop
2. Click on Properties.
3. Have a look at the Target line. The path highlighted here in blue , minus Peachw.exe, is the designated program path.
Please Note: If you click on Open File Location, the program path will appear on your screen.
How can I Change the Data Path in Sage 50?
Please perform the steps given below to change the data path in Sage 50-
1. Navigate to the Sage company file on the system where you are using Sage Accounts
2. Double-click the Company file
3. Click to open with Notepad.
4. Change the paths in the Company file to point to the new data location.
5. Click File,
6. Choose Save
7. Click File
8. Finally, click on Exit.
What are Common Compatibility Issues Faced by Windows 8 Users after installing Sage 50?
In Windows 8, the users may face any of the following issues –
1. The ‘Sage 50 printer not activated error’ message may pop up while using the Sage email writer.
2. The Automatic Backup Scheduler in Sage 50 may not function properly.
3. The user may not be able to use the WebSync Wizard.
4. The Sage Payroll Tax Form Updater may stop suddenly.
5. The Payroll Tax Forms may refuse to run.
6. The Auto Complete ID may not work properly.
 ChatGPT
 Perplxicity
 Claude
 Gemini
 Gork
Gork