Convert CSV to OFX in Sage 50
Updated On: August 7, 2025 10:32 am

Converting data is a useful feature incorporated in sage 50. With the help of this, you can save yourself from manually entering data. In this blog, we will provide you with a few important instructions on how to convert data in CSV format to OFX in the Sage 50 accounting software. We will also discuss other associated matters.
User Navigation
Accounting Professionals & Specialized Experts
Want quick help from accounting software experts? Get in touch with our team members who can install, configure and configure your software for you. Proficient in fixing technical issues, they can help you quickly get back to work whenever you encounter an error in Sage software. Our team is available 24/7 365 days to assist you. To get in touch.
What is the Difference Between CSV and OFX?
OFX stands for Open Financial Exchange. It is a data-stream format designed for exchanging financial information evolved from Microsoft’s OFC (Open Financial Connectivity) and Open Exchange file formats.
CSV stands for Comma-Separated Values. This file type is designed to store tabular data in plain text. It is not a standardized format such as OFX. Different banks and financial institutions provide CSV files in different layouts. Users are recommended to choose CSV files if OFX or QIF file formats are not available.
How to Convert CSV to OFX in Sage 50?
Please ensure to take a proper backup of the Sage 50 data before converting the format from CSV to OFX. If any mistake happens in the import process, you can easily restore your Sage 50 data from a backup.
Next, follow the sequential steps below-
Step 1: Prepare your Excel File
- Open your XLS file in MS Excel and verify it. If the transaction columns do not have the header, make sure to add.
- Select all transactions including the header and copy them to the clipboard.
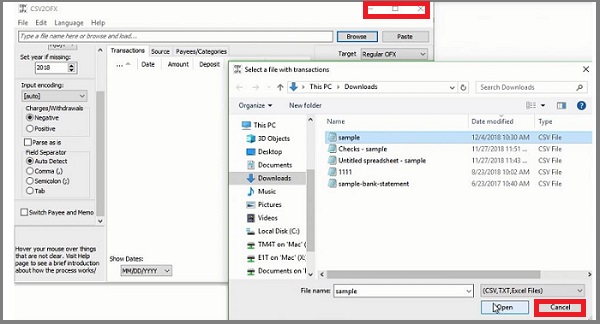
Step 2: Install and Start any Conversion Software such as CSV2OFX
- Download and install any conversion software such as CSV2OFX. You need to make sure that the file is digitally signed. Also, you should allow running the software from an identified developer.
- Start the software and click on the Paste from clipboard button.
- Adjust the mapping if needed.
- Click on the Transactions tab.
- Examine if the transactions for dates, memos, amounts and other columns are assigned correctly.
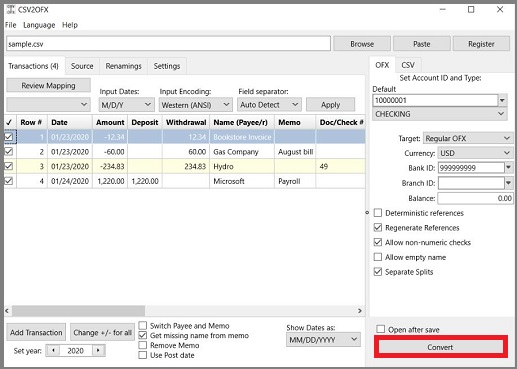
Step 3: Set Your Account Details
- Make sure to set your account details beforehand.
- The details such as bank id, account number, and currency must be set to match the settings in your Sage accounting software.
- If the software checks these on the OFX file and finds a mismatch, it may refuse to import the OFX file.
Step 4: Convert to an OFX File
- Go to the Transactions section.
- Next, click on the Save button to create the OFX file.
- By default, the converter would offer to save the OFX file into the same directory as a CSV or Excel file.
- If you wish, you may change the directory to save the OFX file.
Step 5: Import into MS Money
- Start the MS Money software.
- Go to the File section.
- Go to the main menu.
- Click on Import.
- Click on the Statement file and import the OFX file.
Step 6: Import into Sage 50
- Start the Sage 50 software.
- Now open the Sage company file to which you need to import the OFX file.
- Click on the File tab.
- Navigate to the Import/Export section.
- Now click Import Records.
- Now click on the option labeled Sage 50 import format. Specify OFX.
- Click Next.
- If needed, you may create a backup of your records now.
- Click Browse.
- Now locate the OFX file you need to import.
- Click Next to proceed.
- Once the import process is complete, click on Finish.
How to Export Data From Sage 50 to Excel?
Please follow the steps mentioned below to export data from Sage 50 Excel-
- Open Sage 50 Accounts
- Find the report to export
- Click on File
- Scroll down to click on Select Import/ Export.
- The Select Import/ Export window will pop up on your screen
- On the window, specify the template and the program area
- Click on Export. A window would appear with the Filter button
- Click on the Report Order drop down menu
- specify the precise order in which the fields need to be exported
- From the Date drop-down menu, select the date type and also specify the data range
- Next, click on the Fields tab
- Checkmark the Show check box against all the fields you wish to include in the file to be exported.
- After you have moved the fields you need, click on Options. Click on the arrow button to name the export file. You may also select the default name given. You may modify the file type from .CSV to .xls and can also alter the location where you want to save the exported file.
- If you want the field headings to be exported on the first line, checkmark the box named Include Headings.
- In the If Export File Exists section, select the appropriate option-
- In case you need to receive a prompt from Sage 50 before the file is overwritten, choose the first option.
- If you wish to receive no prompt from Sage 50 before the file gets overwritten, select the 2nd option.
- In case you need to receive a warning from Sage 50 before adding the information to an existing file, choose the 3rd option.
- If you wish to receive no prompt from Sage 50 before adding the information to an existing file, select the 4th option.
- If you have already made changes to the fields and wish to save the same with a new name, click Save and provide a template name.
- Lastly, select OK to start the export process.
Also Read: Cannot Export a Report from Sage to Excel
Conclusion!
We hope the simple steps provided above would help you convert data in CSV format to OFX in the Sage 50 accounting software. You simply need to perform the steps sequentially. If you have any difficulties in performing these steps, you may get in touch with some authorized Sage professionals.
Frequently Asked Questions:
Can an Excel File be considered a CSV File?
There is an important difference between an excel file and a CSV file. The CSV format is a plain text format where the values are separated by commas (Comma Separated Values). On the other hand, the XLS is an Excel Sheets binary file format. It holds information about the worksheets in a file, including the content and formatting.
How to Export a CSV File from Sage 50?
Please follow the steps below-
1. Open Sage 50 Accounts
2. Navigate to the report you want to export.
3. Click on the Export tab.
4. Browse to the folder where you wish to save the exported data.
5. Give a suitable file name.
6 Choose CSV in the Save as Type drop-down box.
7. Click Save.
What are the advantages of the Sage 50 Excel Integration Module?
Some of the important benefits of this module are mentioned below-
1. It includes a plethora of summaries and reports to help you make good use of your data.
2. You can allow other users to access the data without even installing the Sage 50 software
3. This module lets you combine your account data with other information.
4. While granting access to other users, Sage would ensure the security of your company data.
5. The example sheets incorporated in the Sage 50 Excel Integration Module would provide you with a clear understanding of how it works.
Is it required to take a Backup of My Company Data while importing an OFX File into Sage 50?
1. Yes. You should make sure to take a proper backup of your important company data before importing an OFX file into Sage 50.
2. This is because in case any mistake occurs during the import process, you can restore your Sage 50 data easily from the backup.
 ChatGPT
 Perplxicity
 Claude
 Gemini
 Gork
Gork