Fix Sage 50 Invoice Not Posted Error
Updated On: July 1, 2025 6:43 am

Payment of invoices is a critical function for any business. It leads to cash flow from customers/services /users of products. It is the regular inflow of cash that keeps a business afloat. Needless to say that an unwanted stoppage or delay in payment may hamper the day-to-day operations of the business.
User Navigation
- Accounting Professionals & Specialized Experts
- What Causes the Sage 50 Invoice not Posted Error?
- Methods Fix the Sage 50 Invoice not Posted Issue
- Sage 50 Accounts Posted Invoice but Showing Not Paid
- Solution:
- Sales Invoice Showing Unpaid or Incorrect Amount Paid in Sage 50
- Solution:
- Final Words
- Frequently Asked Questions:
Accounting Professionals & Specialized Experts
Want quick help from accounting software experts? Get in touch with our team members who can install, configure and configure your software for you. Proficient in fixing technical issues, they can help you quickly get back to work whenever you encounter an error in Sage software. Our team is available 24/7 365 days to assist you. To get in touch.
Therefore, it is highly imperative for a business; small or large, to keep proper track of its sales and customers. The sales invoicing feature in Sage 50 can be an important help in this context. With the help of the invoicing tool in Sage 50, you can prepare invoices easily and accurately. You can customize them as needed and send them to your customers over email. Moreover, Sage 50 can track the revenue received and expenses incurred in your business during the entire year. With all such information, you can keep a track of what the customers are buying from you, how much payment is due from them, when they are due and others.
However, many users of Sage 50 have informed that they have faced issues after creating invoices in Sage 50. They said they created and updated the invoice as normal, but, it is not posted on to the customer account. If you are also facing the Sage 50 invoice not posted issue, you have landed in the right place. In this blog, we will look at the causes and will provide some easy remedies to fix this common issue.
Here we go!
What Causes the Sage 50 Invoice not Posted Error?
Although many technical reasons may contribute to this error, the primary reasons are listed below-
- some kind of miscommunication with the Transaction Manager.
- if you have tried to delete a transaction, unsuccessfully.
- There is a problem with the data.
Also Read: Delete Transactions on Sage 50
Methods Fix the Sage 50 Invoice not Posted Issue
Here, we will show multiple methods to fix this issue :-
Method 1: Stop and Start the Transaction Manager
- Open the workstation that contains the company data.
- Click on the Start menu.
- Choose Settings.
- Go to Control Panel.
- Click on Administrative Tools.
- Go to Services.
- From the list, locate the Sage 50 Accounting Transaction Manager.
- Right-click on it and select Start, if not running (or Stop, if running).
- Right-click the item again and select Stop (or Start).
Method 2: Turn on the Transaction Confirmation
- Navigate to the Home window.
- Click on the Setup menu.
- Click on User Preferences.
- Choose Transaction Confirmation.
- Checkmark or clear the box adjacent to Confirmation Message.
- Click OK.
Method 3: Turn off Fast Posting
- Open the Sage 50 application.
- Go to Setup.
- Click on Settings.
- Go to Company.
- Choose Systems.
- Uncheck the field adjacent to Fast Posting.
- Please Note- If you are not able to go to Setup and Settings and are getting a message stating that there are unposted transactions, you can move files to the server where the database is kept.
- If you can’t access the server, you may move files locally to a workstation.
- Make sure to move the files back after the settings are implemented.
- Moving the file locally while unposted transactions are there may force the unposted transactions to be removed from the system. You will then need to re-enter those.
Also Read: How do I Invoicing My Clients Using Sage 50?
Sage 50 Accounts Posted Invoice but Showing Not Paid
There are certain times when Invoice shows that it has been paid in full, but actually is not paid in the first place. This could occur due to following reasons:
- The Invoices are not entered correctly.
- There is a Data synchronization Error.
- A damaged JRNLROW.DAT.
Solution:
Section I: Verification of Invoice amount/Payment

- Start by Selecting Reports & Form, Accounts Payable and Accounts Receivable in Sage 50, and then Vendor Transaction History or Customer Transaction History.
- Next Click Options, and then Filter it for the correct Vendor or Customer ID and Date Range.
- Now Click OK.
- Locate the invoice in question;
- In case there is no payment linked to that invoice Double-click the invoice.
- Verify invoice does not have a 0.00 amount in Net Due, and then go to Section II.
- Incase the Invoice has a 0.00 amount, an amount will need to be entered in the amount field in order to change it from Paid in Full.
Section II: Synchronization Test

- Start by Changing the accounting period to Period 1.
- Next Load the integrity check by clicking Help, Support Utilities, Integrity Check.
- Now click Select Backup
- Next enter a unique name for the backup
- Now click Save.
- Select Reindex Files on the left,
- Next select Vendor from the list on the right
- Now click OK
- Allow Load the integrity check
- Now Click Continue since a backup has been created in step 3
- Next Select Reindex Files, and then select Jrnl Header from the list
- Now click OK
- Allow to Load the integrity check
- Click Continue
- Now Select Reindex Files, and then select Jrnl Row, and click OK
- Allow Load the integrity check
- Now click Continue
- Go to the Data Synchronization Tests section and Select Vendor / Journal
- Now click OK.
- Once the tests have finished, verify if your issue has been resolved
Section III: Invoice/Payment Sync Test
- Start by creating a backup of your data.
- Next Change your accounting period to Period 1
- Now Load or access the Integrity Check.
- Go to the Invoice/Payment Sync Tests section and Select the Accounts Payable option.
Note: If you need to run the Account Receivable test then select Accounts Receivable - Now go to the Correction Strategy section and choose an option
- Now select OK.
Note: If selecting a Correction Strategy of Ask Each Time, a window will pop up asking which is correct. The options will be either the invoice is correct or the payment is correct. Look at the options to determine which you should choose then select OK. - Verify and Confirm if the issue is resolved.
- In case the issue has not been resolved, then you need to restore Sage 50 backup that was created before the Integrity Test and select the other option.
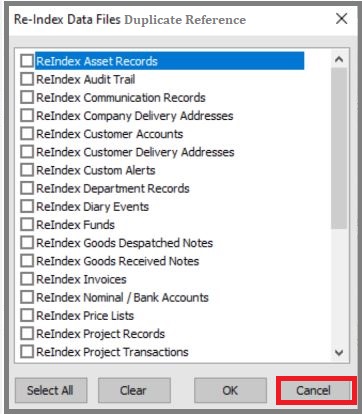
Section IV: Duplicate Reference Test

- Start by Changing your accounting period to Period 1.
- Next Load or access the Integrity Check.
- Go to the bottom of the screen and Select the Duplicate Reference
- Now click OK.
- Finally Confirm the issue is resolved
Section V: Posting Method is Batch

- In this step you need to Post the voided check
- Go to the top of the main screen, select Tasks, System and then Post.
- Navigate to the Post window here you can select All Journals , or select the individual Journal(s) as required to post
- Now click OK.
- Next verify if the transactions were posted,
- The user can view your transaction list and select Unposted from the Status dropdown
Section VI: Delete and re-create
- Either Print or record any pertinent information from the entire transaction series.
- Now Delete all the payments and the invoice.
- Next Re-enter the invoice and the payments as required.
Note: To maintain an audit trail for voided checks, the user can create a zero-dollar check using the same check number as a place-holder.
Section VII: Damaged JRNLROW.DAT File
- Restore the latest backup where the issue does not appear.
- Go to the top of the main screen, select Tasks, System and then Post.
- Go to the Post window, here you can select All Journals , or select the individual Journal(s) as required to post and click OK.
- In order to verify if the transactions were posted, you can view your transaction list and select Unposted from the Status dropdown
Section VIII: Zero Dollar ($0.00) Invoice
- In case an invoice was created and saved with zero dollar net amount then that invoice will be saved automatically as paid in full.
- Once the Zero dollar invoices are saved and have no charge therefore there is no payment needed and thus paid in full.
- Working as designed
Also Read: Fix Sage Drive is Not Syncing
Sales Invoice Showing Unpaid or Incorrect Amount Paid in Sage 50
There are times when the Invoice shows unpaid or an incorrect amount has been paid in Sage 50. The main reason for this can be:
- A damaged transaction
- Or a transaction is still waiting to post in SmartPosting Manager
You know you are facing with this error if any of the following symptoms occur:
- The Sales invoice has been paid in full but showing as unpaid
- While the Sales invoice has not been paid but shows as paid
- Unpaid invoice shows partial or full amount paid
- A certain sales invoice is paid in full but showing as unpaid
- Paid invoices showing on Aged Receivables report
- User is Unable to delete invoice
- One Cannot delete invoice
- The Delete button is gray / grayed / dimmed
Solution:
Section I: The Payment is Not Posted
Note: This part of the solution is applicable if using Batch or SmartPosting posting methods
- Click Tasks, System, Post
- Next Select All Journals
- Now Click OK
- Finally Check the payment status of the invoice;
- In case still incorrect, go to the next section
Section II: Receipt is Applied to Revenues or Amount Paid is $0
- Click Lists, Customers & Sales, Receipts
- Go to the date and search options to find the receipt that paid the invoice
- Now Double-click the receipt to open it
- Incase the receipt was applied to the invoice:
- You need to Verify that there is an Amount Paid on the invoice line; if not, rectify this and save the receipt
- Next Verification of the receipt date is before the date through which the Aged Receivables report was run; if not, re-run the Aged Receivables report for a date after the receipt date
- In case none of these conditions apply, or if correcting them does not rectify the issue, go to Section III
- Incase the receipt was applied to revenues:
- Note: If the receipt is in a closed year, it cannot be edited; instead, create a credit memo in the amount of the invoice and apply it against the invoice as a receipt.
- Remove the line item on the Apply to Revenues tab
- Now Select the Apply to Invoices tab
- Next Check Pay on the line for the invoice
- Finally Click Save
Section III: Damaged Transaction
- Start by Back up the company
- Open the invoice
- Incase the View related transactions is displayed, click it;
- In case it is not shown, Go to to Step 4
- If any payments/receipts or credit memos are displayed, verify if that the amount paid on the invoice corresponds to the amount paid by the linked transaction(s);
- if it does not, continue with these steps
- Close the invoice
- Click Help > Customer Support & Service > Integrity Check
- Next Click Continue
- Under Invoice/Payment Sync Tests, check Accounts Receivable (sales invoices) or Accounts Payable (purchase invoices)
- Make sure to Leave Correction Strategy set to Ask each time
- Once an error is located, a prompt will appear to select which transaction is correct
- If the amount paid showing on the invoice is correct, select Invoice
- If the invoice paid showing on the invoice is incorrect, select Payment
- Now Verify if the invoice now shows the correct amount due/paid
- Incase the amount paid is still incorrect, delete and recreate the payment and invoice
Note: You have to use the same details (date, GL accounts, etc.) when recreating the transactions
Also Read: Fix Sage 50 Invoice Errors
Final Words
We hope the discussion above would help you resolve the Sage 50 invoice not posted issue once and for all. If you are still facing any difficulties in performing the steps above or if you have any queries, you may get in touch with some experienced Sage professionals.
Frequently Asked Questions:
How can I Delete an Invoice in Sage 50 Accounts?
Please follow the steps below to delete an invoice in Sage 50 Accounts –
1. Open Sage 50.
2. Navigate to the Invoicing Window.
3. Select the invoice (s) you wish to delete.
4. Now click on the Delete tab.
5. A prompt will appear, asking if you want to delete invoice (s).
6. Click on Yes for deleting the invoice now. If you want more time, click No.
7. If the selected invoice is yet to be posted or printed, Sage will display a warning.
8. You may be asked to confirm the deletion once again.
Can I Use My Chosen Layout while Sending Invoices in Sage 50?
Yes, you can. While printing an invoice, you can choose the layout you like, from a plethora of options. You can also mark your preferred and most used layout on the favorite section. It will help your chosen layout load faster, while printing/emailing the invoice to the customers.
What are the Points to Consider before Creating my First Invoice in Sage 50?
Keeping in mind the following points will help you avoid issues related to posting or creating invoice in Sage 50 in future-
1. Create contact records for all your customers
2. Add a company logo
3. Specify your document preferences ( such as terms & conditions, prefixes and document numbering)
4. Add an invoice template of your choice
What is the Procedure to Create a Pro Forma Invoice in Sage 50?
Please follow the steps below to raise a pro forma invoice –
1. Go to the Sales section
2. Click Sales Invoices.
3. Click on New Invoice.
4. Enter the details you need to induct into the invoice
5. From the list displayed on your screen, click on the checkbox named Pro Forma Invoice.
6. Click any of the options: Save & close the invoice, Save or Save & Email.
