Sage .NET API Errors

Have you faced any issues related to different Sage .NET API errors of late? Are you looking for simple solutions to fix such issues? Your search ends here. We will tell you why!
User Navigation
Most of the new modules of Sage CRM work on .NET API technology like the Relationships tab. Users are given a provision to create API DLLs for your custom entities. The overall working remains the same where we add the DLLs in the Custom .NET folder and call the methods from CRM blocks. However while dealing with .NET customizations in Sage CRM, we come across some common errors where .NET logs do not throw much light on the exact issue.
Simply go through this blog. Here, we will have a brief discussion on various Sage .NET API Errors and will provide easy solutions to troubleshoot each of them.
Read More : Sage CRM Sage 300 ERP Integration Configuration Guide
Here we go!
Sage .NET API Error “File Does not Exist at this Path”
Cause: This error message pops up when the RelatedEntities.dll file used to run the relationship tab of Sage CRM is either replaced or changed with a different path than where your Sage CRM is currently installed. This means, an improper path is set for the dll file in the Sysparams table. Hence, while accessing, the relationship tab user will experience the said error.
Resolution
To resolve this issue, locate the proper path to the Relatedentities.dll and put the following query at the back-end with the proper path.
“update custom_sysparams
set parm_Value=’Your correct path goes here‘
where parm_Name=’DotNetDllDirectory’ “
Sage .NET API Error “An Error has Occurred in a CRM DOT NET(.NET) Customization
Cause: This error message comes up when the SageCRM.NET and SageCrmWrapper files are replaced during the updated installation of Sage CRM. When a new Sage CRM is installed in the same directory, the old files are replaced with the new ones. Hence, the functionalities that run on .NET (such as the Relationship tab or customization) will display this error message to the users.
Resolution
Let us suppose your Sage CRM v7.1 is installed in the D drive on your system. Then, follow the steps shown below to register the Sage CRM .NET DLLs manually.
- Login to the Sage CRM server wi the help of your Administrator account.
- Run the command prompt
- Browse to the path i.e. D:\Program Files\Sage\CRM\CRMDotNet\7.1\. It will have the SageCRMNet.dll and SageCRMWrapper.dll files for that version.
- To register SageCRMNet.dll , run the command as shown in the screenshot. Make sure to enter the correct name and file path. In our case, D:\Program Files\Sage\CRM\CRMDotNet\7.1> regasm SageCRMNet.dll
- After the registration, a message will appear to inform you that the registration was successful
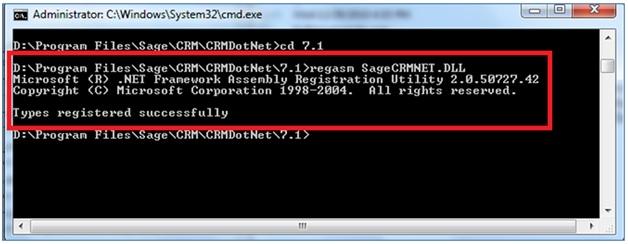
- Next, install the DLL into the Global Assembly cache (GAC). To do this, execute the following command, D:\Program Files\Sage\CRM\CRMDotNet\7.1> gacutil -i SageCRMNet.dll
- After successful registration, a message will pop up saying, “Assembly successfully added to the cache”.
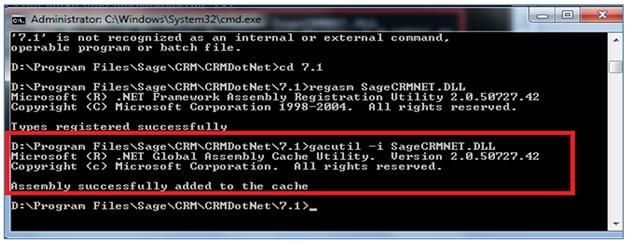
- Repeat the steps above to register the SageCRMWrapper.dll and install into GAC.
- Finally, run the IISREST command.
So, if there are any issues in future with the .NET Customization in Sage CRM, first verify the functioning of the Relationships tab. If you find any issues, you can follow the steps shown above to register the correct Sage CRM .NET and Wrapper DLL.
Sage .NET API Error – Issues with backward Compatibility
Cause: At the time of developing the .NET API DLLs, these are built to work in one version of Sage CRM. However, when a user tries to configure them for other versions, it leads to several .NET errors.
Resolution
To ensure that your old DLLs are compatible with the latest Sage CRM version, please follow the steps below-
- Open the DLL Source code in IDE.
- Expand the References node.
- Here you will see the SageCRMNet.dll added.
- Right click on it and click Remove
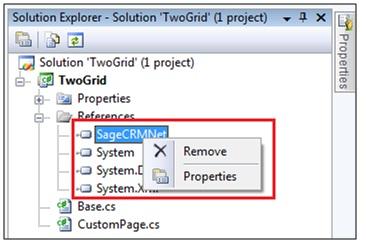
- Now, click on the References node
- Click on the Add Reference option.
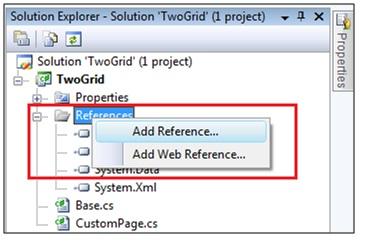
- Click on the Browse tab
- Browse to the following path where the SageCRMNet.dll for new version has been installed.
- C:\Program Files\Sage\<<CRMInstance>>\CRMDotNet\7.1
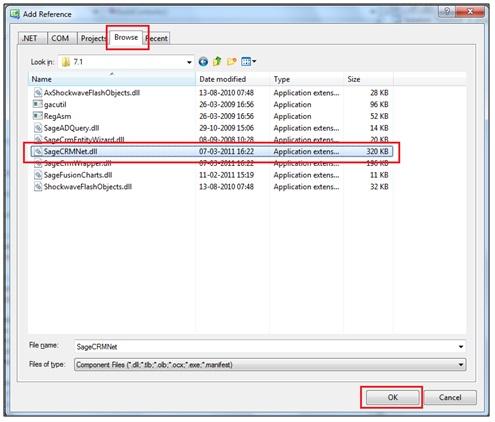
- Select the SageCRMNet.dll
- Click on the OK button
- Now, rebuild the full solution and verify once again in Sage CRM.
Also Read : How to Fix Sage 50 clr20r3 Error
Final Words
We hope the above discussion would help you have a fair idea about different types of Sage .NET API Errors and how to resolve them. If you are still troubled by such errors or you are having any queries related to them, we would advise you to consult with some of the seasoned Sage professionals.
Accounting Professionals & Specialized Experts
Want quick help from accounting software experts? Get in touch with our team members who can install, configure and configure your software for you. Proficient in fixing technical issues, they can help you quickly get back to work whenever you encounter an error in Sage software. Our team is available 24/7 365 days to assist you. To get in touch.
Frequently Asked Questions (FAQs)
What causes the Sage .Net Error?
Although many technical reasons may contribute to this error, we will list the most prominent ones here-
1. Damaged program path
2. Damaged data path
3. Damaged or missing Microsoft .NET Framework
4. Damaged shared folder
5. Computers are on different networks
What is an API?
API stands for Application Programming Interface. It is a set of standards and programming instructions getting access to web-based software that facilitates different platforms to interact with each other. With the help of the API interface, software programs can interact effectively without any human intervention.
What is the Procedure to Completely Uninstall the Microsoft .Net Framework from my Windows 10 System?
You cannot uninstall the framework completely from Windows 10. At best, you can force an update. Here are the steps to follow-
1. Go to Control Panel
2. Navigate to Programs and Features
3. Click on the tab ‘Turn Windows features on or off’
4. Click on the + symbol near .NET framework 4.6 Advanced Services
5. Uncheck the box next to ASP .NET 4.6.
6. Click OK
7. Click on the tab ‘Turn Windows features on or off’
8. Click on the + symbol near .NET framework 4.6 Advanced Services
9. Uncheck the box next to ASP .NET 4.6.
10. Click OK
11. Now, Windows will download an update of the MS .NET framework. If the update is successful, restart the computer. If not, contact an IT personnel for help.
