Sage 300 ERP User Authorization Export
Updated On: March 18, 2025 9:15 am

Making sure your employees have access to the right information and can do their jobs effectively is critical for any business. That’s why user authorization is so important, and why you should take advantage of Sage 300 ERP’s authorization export feature. User authorization is one of the key elements in protecting confidential data from malicious actors, as well as ensuring that people are accessing only the information they need to do their jobs. With Sage 300 ERP user authorization export feature, organizations can easily customize user roles, permissions, and security settings with a few clicks. Read on to learn more about how this powerful tool can help keep your business secure and compliant.
User Navigation
Accounting Professionals & Specialized Experts
Want quick help from accounting software experts? Get in touch with our team members who can install, configure and configure your software for you. Proficient in fixing technical issues, they can help you quickly get back to work whenever you encounter an error in Sage software. Our team is available 24/7 365 days to assist you. To get in touch.
Sage is one of the leading names for a ‘virtual Financial Assistant’ who is there to take care of all your accounting needs. With constant and timely updates, Sage ensures that the users remain in-Vougue of the latest in the Financial world and its subsequent requirements. Likewise the Sage 300 ERP User Authorization Export is one such feature that has been a matter of discussion in the current scheme of things. But before we get into the topic’s details, let us look at what the Sage 300 ERP is all about.
Sage 300 ERP
Simply put the Sage ERP or the Enterprise Software platform has been designed to allow you Real-Time insight into the various aspects of the performance of the Company, Optimization of the processes and also to be able to streamline the business management for better ease as required in the future timeline. This is essentially done by integrating the day-to-day business processes. This way it becomes easy for the leaders and other people in specific positions to be able to better comprehend the accurate company activities by being able to make a connection to all the data points and to be able to offer a better business insight.
The latest version of the Sage 300 ERP is Cloud-based enterprise software that manages to bring together HR, Accounting, Customer Relationship Management or CRM onto the same platform. This allows all the people ‘in the know’ to be able to access and get acquainted with the regular flow of data as and when it happens. Hence, in a way, the Sage ERP simplifies the entire process by packaging it into one point and channelling it into a simple system.
Also Read: How to Access My Companies in Sage 300?
Why Do You Need a Sage ERP for your Business?
To start with, Sage ERP makes various aspects of your day-to-day business a breeze. This is a fully integrated system that allows the relevant employees from across various departments to be able to access the required data as required (real-time). In a way, this is one of the most reliable ways to connect the Front Office with the Back office. Hence it can be easily termed as a complete Enterprise Management Solution.
Hene with the right kind of implementation, one can easily identify the areas that need improvement, and be able to implement ‘profitable’ decisions. In a way. With the Sage 300 ERP by your side, one can easily ‘get a fine overview’ of things as and when they occur. This way you can get into the road map of success and see the results materialise as you have always wanted.
The other aspect of the ERP system is that your business does not have to be of a certain ‘stature’ and size in order to implement it. In fact, experts have suggested that owners of small to medium-sized businesses opt for the relevant ERP system as it will offer better management for your everyday operations and offer you a better idea about the resulting growth and scale. The fun does not stop here; now with the all-cool Sage Cloud by your side, the ERP systems have not been the same, as it has shown growth on another level as compared to the otherwise traditional ERP systems. Likewise, there are also various other more sophisticated aspects of the businesses like the distribution, manufacturing, and engineering services, that are also addressed with the more advanced version of Sage (Sage X3 to be more precise).
On a final note, Sage ERP is worth every bit of your time and attention as it helps collaborate with the relevant departments as required, thus, offering you the required results ‘on a platter’ without having to undergo complex stages of implementation for the same. Thus, the various aspects of financial regulations, and areas that require improvement are better highlighted with the same. So, what is the Sage 300 Erp User Authorization Export all about? Let us take a look:
Also Read: How to Reset Admin Password in Sage 300 ERP?
Sage 300 ERP User Authorization Export: All that You Need to Know
To start with, this feature is more of an Enquiry and Reporting tool. The Export technology, as it is termed by the experts, has been used to be able to transfer the data and as when required using the Sage ERP:
- Launch Sage ERP on the system
- Open the File Menu
- Now, select Export
- At this point you need to note that there is a File, Export menu located in every Finder in the system.
- Next, you will get a notification where you need to specify the ‘Format’ you need to Export to. Here you will get different Export formats.
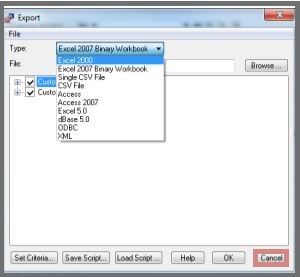
- Formatting: Here, you need to ensure that you decide upon the location you wish to transfer the data. This needs to be the format that works best for you according to your program type.
- Usually, there you can choose from either ‘Excel’ or ‘Single File CSV’. As most people are well-versed in Excel, it is widely used. Also, most experts agree on the fact that Excel is one of the most popular tools for Data Analysis on the Sage ERP system. Hence one can easily generate graphs and tables as required.
- As for the Single CSV file, there are users who swear by it, as it is easy to work with the Scripting tools and other Programs. Essentially, the CSV files are simple text files where each value is separated by commas. Also, it is easy to open these files and parse them. Being simple, these files are and hence can be Exported easily, making it specially beneficial for the larger files. Finally, the CSV files can be read easily by the Excel also.
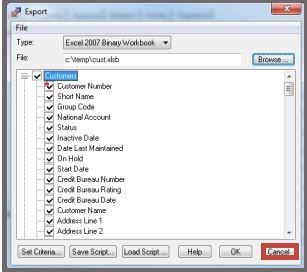
- Selecting the Field/Table: Next, steps involves checking or unchecking of all the fields that you wish to have. For this, you need to go to the fields in the Main Table and the other Detailed Table. This is because all the most documents in Sage 300 comprises of Header Records with various detailed tables, hence each Order Header Record comprises of multiple detailed records for all the items that make the Order.
- Here, it is recommended to ensure that you follow the above steps and not just opt for the Default of all the fields selected. Otherwise, not much of a difference will be made in the final results.
- The other method to do the above is to also right click on the table Name in order to select or Un-select all the fields in the table. Also, one can also rename the Table name, so that it can be easily identified in the Export Field.
- Setting Cretaria: there are times and cases, where the all the customers exported to excel have been taken up by the in Active customers you do not require. Under such a circumstance, one can easily filter these within the Excel sheet or do the same from the Export. This way, these will not interfere with the upcoming steps of the process.
- To do so, you can go to Export, and click on Set Criteria. This offers to define a filter to the selected record that are being Exported
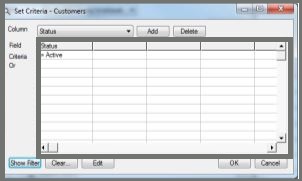
- In the above example, the dialog is more of a Query by example kind, where the field name is spcfified on the Title Area of the Grid. This way the ‘and’ items go horizontally and the ‘Or’ items go vertically. Hence, as shown in the dialogue box above, you can add another value to the Right then both need to be true in order for the record to be exported. If anothe value is added below then the values will be Exported if the Values were either of these. Hence, one can set up a rather sophisticated creteris with the help of this table.
- In case of SQL where Clauses, the user can click on the ‘Show Filter’ option to check the Where Clause you are trying to create or build.
- To Load/Save Script: Field selection and their subsequent setting of the criteria can be quite a task. This is quite tiresome, if you need to do the ‘Export’ job every single day. This is all the more because the user needs to set up all the options as required and then Save the same in the script file. Now, you need to execute the Script file created from the Macro.
- Other than the code for the Macro, the user also needs to add two references: “Accpac Import/Export 1.0” and “Microsoft XML, v4.0”.
- This will result in the return value of the export operation to be a XML file. This file comprises of all the details of the steps so occurred.
Also Read: Sage 300 Web API Intermittent POST Success with OE Orders
Conclusion!
So, you see, the current ‘status’ of the Export function in Sage is only an advanced version of the one that had always been around since the version 1.0 A. Nonetheless, to say, the Export tool is a powerful one, that can be used massively for sharing and analyzing the various problems at the different stages of execution. That’s it for this time friends; all that you need to know about Sage 300 ERP User Authorization Export. Be sure to take a good look at each of the facts, features and solutions for a better understanding. However, if you still encounter any problems, be sure to reach out 1800 964 3096 to our team of experts and we will assist you accordingly.
Frequently Asked Questions:
How to Export Data from Sage 300?
To do so, you will need to:
1. Open the Dialog box or the Screen for the data that needs to be Exported.
2. Now, click on File
3. Next, click on Export.
4. Now, go to the Type Field
5. Click on Export Type.
6. Now click on Browse.
7. Here you specify the File that needs to be Exported.
How to Export General Ledger from Sage?
To do so, you will need to:
1. Launch General Ledger
2. Go to G/L Consolidations
3. Click on Export.
4. Keep in mind that only a Single user can access G/L Consol Export Screen at a time.
5. Here, you need to specify the Process ID needed for the Export.
6. Go to the Export Folder field and click on the Browse option beside it in order to select the folder you need to create for the exported Files.
7. At this stage if you click on Allow Rentime Edit, at the time of the export process, it will clear out any of the options that have been selected in the Export Data Selection area.
8. In case the export method selected Balances, Net Charges or Transactions by the Fiscal period; likewise, you can also change the year and Period.
9. Now, click on Export.
10. And you are done.
How to Print from Sage 300 to Excel?
To start with, you will need to:
1. Click select the Printer Setup option.
2. Click on the Print to File check box.
3. Click on Select File option.
4. Here, you need to enter the File name.
5. Next, click on Save As type to Select the MS Office Excel Work Book.
6. And You are done.
How does one Export the Data from Sage?
To do so, you will need to:
1. Launch the required module, like Customers
2. Now, click on Reports
3. Next select the required folder or File, like Customer Details.
4. Now, select the required Report, like Customers Record CSV.
5. Now, click on Export.
6. Browse to the location to Save the file.
7. At this point you will need to enter the required File Name.
8. This will activate the Save As drop-down list
9. From the list, select the CSV Files (* .csv)
10. Now, click on Save
11. Enter the required details.
12. Click on OK
13. And you are done.
 ChatGPT
 Perplxicity
 Claude
 Gemini
 Gork
Gork